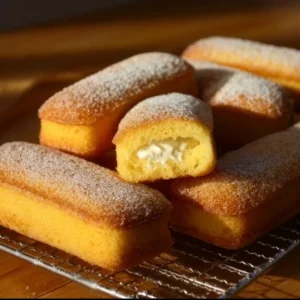
Homemade Twinkies
Arriving home after a long day can feel like stepping into a tornado. Between the after-school chaos, homework battles, and dinner prep, it’s easy to feel overwhelmed. How can you whip up something delicious that will please everyone when time is against you? That’s where this quick, friendly recipe for Homemade Twinkies comes in. This treat is not only simple to make, but it’s also a family-approved favorite that can help ease weeknight stress.
A Quick Look at This Homemade Twinkies Recipe
Making Homemade Twinkies is a breeze, even on the busiest nights! With just a few staple ingredients like all-purpose flour and sugar, you’ll create a delightful dessert that appeals to kids and adults alike. This recipe is designed for speed, ensuring minimal cleanup while delivering big flavor. Whether you need a quick treat or a special dessert for family movie night, these Twinkies promise reliability with every bite.
Ingredients You’ll Need for Homemade Twinkies
Essentials
- 1 cup all-purpose flour: A staple in any pantry, perfect for baking.
- 1 teaspoon baking powder: Gives the Twinkies their fluffy texture.
- 1/4 teaspoon salt: Enhances the sweetness and flavor of the cakes.
- 1/2 cup sugar: Brings the sweetness that kids love.
- 1/4 cup unsalted butter, softened: Adds richness and moisture.
- 2 large eggs: Helps bind the ingredients together.
- 1 teaspoon vanilla extract: Adds delicious flavor to the batter.
- 1/2 cup milk: Keeps the cake tender and moist.
Filling:
- 1 cup heavy cream: A rich, creamy filling for that classic Twinkie taste.
- 1/4 cup powdered sugar: Sweetens the filling without granularity.
- 1 teaspoon vanilla extract: Flavors the filling beautifully.
Optional Add-ons
- Chocolate chips: Perfect for chocolate lovers looking for a twist.
- Sprinkles: Add fun colors and textures to your Twinkies.
- Fruit puree: Swirl in some fruit for a fruity flavor boost.
Substitutions and Shortcuts
- Cake flour: This can be used instead of all-purpose flour for an even lighter texture.
- Milk alternatives: Use almond or oat milk for a dairy-free version.
- Store-bought whipped cream: If you’re short on time, opt for a ready-made whipped topping.
How to Make Homemade Twinkies Step-by-Step
- Preheat your oven to 350°F (175°C). Grease your Twinkie mold or a muffin tin, making cleanup a breeze.
- In a large bowl, mix together the flour, baking powder, and salt until well combined.
- In another bowl, cream the sugar and softened butter together until light and fluffy. No need for a mixer—just use a fork or a wooden spoon.
- Crack in the eggs and add in the vanilla extract, mixing until fully incorporated.
- Gradually add the dry ingredients, alternating with the milk. Don’t worry about precision; it doesn’t have to be perfect. Just mix until you see no more dry flour.
- Pour the batter into your mold, filling each section about three-quarters full. Bake for 20 minutes, or until golden brown and a toothpick comes out clean.
- Allow the cakes to cool for a few minutes before carefully removing them from the mold.
- For the filling, whip together heavy cream, powdered sugar, and vanilla extract until stiff peaks form. This is easy and can be done by hand or with a hand mixer if you have one available.
- Once the Twinkies are cool, fill them with the whipped cream, and enjoy!
Common Mistakes to Avoid
Cooking can be a bit hectic, especially on busy nights. Avoiding these common mistakes will help streamline your process and keep those frustrating moments at bay.
Mistake 1: Not Greasing the Mold
Skipping this step can lead to cakes sticking, causing a messy cleanup. Always grease your mold—this makes removing the cakes so much easier!
Mistake 2: Overmixing the Batter
Muffin and cake batters benefit from being mixed just until combined. Overmixing can lead to tough cakes, so don’t hesitate to take it easy on the mixing.
Mistake 3: Ignoring Cooling Time
When you rush to fill warm cakes, the filling can melt, leaving you with drippy treats. Allow your Twinkies to cool fully before adding the whipped cream filling.
Serving Suggestions for Homemade Twinkies
These Homemade Twinkies are delightful on their own, but pairing them with the right sides can elevate your meal effortlessly.
Kid-Friendly Sides
Serve alongside fresh fruit or a simple salad to balance the sweetness. Cut strawberries or apple slices are perfect for dipping in.
Easy Add-ons
Consider drizzling some chocolate sauce or adding a dusting of powdered sugar on top for a charming finish.
Minimal Prep
To keep the dinner table calm, while enjoying your Twinkies, keep the sides simple and focus on enjoying family time. A quick bowl of pre-cut veggies can offer a crunchy, healthy option without any fuss!
Conclusion
This recipe for Homemade Twinkies saves time and energy, making it a perfect solution for busy families. Its flexibility is a real game-changer for the pickiest eaters, allowing you to customize flavors easily. Plus, it works seamlessly with real-life family schedules, fitting in perfectly between homework and bedtime. I hope you give this recipe a try and share it with your family!
To explore more delicious options, check out this delightful Homemade Twinkies recipe or get inspired by ideas from Zoe Bakes.
FAQs About Homemade Twinkies
Making Homemade Twinkies typically takes about 30 minutes plus cooling time. This recipe is fast enough to squeeze in even on the busiest nights!
Yes! Store your Homemade Twinkies in an airtight container in the refrigerator for up to 3 days. They maintain their flavor and freshness very well.
Absolutely! You can swap in chocolate chips or use flavored extracts to customize the filling, making them more appealing to children with different tastes.
Yes, you can freeze the filled Homemade Twinkies! Just ensure they’re well-wrapped in plastic wrap and placed in an airtight container. They will remain delicious for up to a month.
Try adding sprinkles, crushed cookies, or a drizzle of melted chocolate on top for extra fun. Your family will love the variety!

Homemade Twinkies
Ingredients
Essentials
- 1 cup all-purpose flour A staple in any pantry, perfect for baking.
- 1 teaspoon baking powder Gives the Twinkies their fluffy texture.
- 1/4 teaspoon salt Enhances the sweetness and flavor of the cakes.
- 1/2 cup sugar Brings the sweetness that kids love.
- 1/4 cup unsalted butter, softened Adds richness and moisture.
- 2 large eggs Helps bind the ingredients together.
- 1 teaspoon vanilla extract Adds delicious flavor to the batter.
- 1/2 cup milk Keeps the cake tender and moist.
Filling
- 1 cup heavy cream A rich, creamy filling for that classic Twinkie taste.
- 1/4 cup powdered sugar Sweetens the filling without granularity.
- 1 teaspoon vanilla extract Flavors the filling beautifully.
Optional Add-ons
- to taste chocolate chips Perfect for chocolate lovers looking for a twist.
- to taste sprinkles Add fun colors and textures to your Twinkies.
- to taste fruit puree Swirl in some fruit for a fruity flavor boost.
Instructions
Preparation
- Preheat your oven to 350°F (175°C). Grease your Twinkie mold or a muffin tin.
- In a large bowl, mix together the flour, baking powder, and salt until well combined.
- In another bowl, cream the sugar and softened butter together until light and fluffy.
- Crack in the eggs and add in the vanilla extract, mixing until fully incorporated.
- Gradually add the dry ingredients, alternating with the milk. Mix until just combined.
Baking
- Pour the batter into your mold, filling each section about three-quarters full.
- Bake for 20 minutes, or until golden brown and a toothpick comes out clean.
- Allow the cakes to cool for a few minutes before carefully removing them from the mold.
Filling
- For the filling, whip together heavy cream, powdered sugar, and vanilla extract until stiff peaks form.
- Once the Twinkies are cool, fill them with the whipped cream, and enjoy!