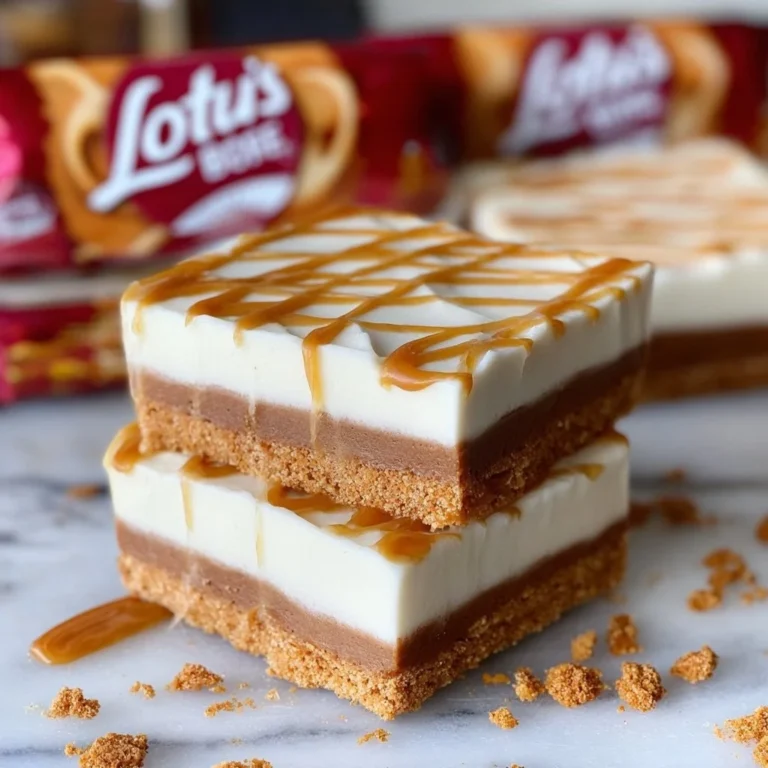
S’mores Cookie Dough Bars
There’s a particular hush that falls over a kitchen when sugar and butter meet — the butter’s soft sheen, the brown sugar’s molasses perfume, and the promise of molten chocolate waiting beneath a crisp, golden crust. I know many home cooks hesitate when a recipe looks indulgent: “Is it complicated? Will it take hours? Will it need special tools?” I created these S’mores Cookie Dough Bars to answer those worries with a confident yes — yes to indulgence, and no to fuss. If you love bar cookies and toasted-s’mores nostalgia, you’ll find these bars both sumptuous and thoroughly approachable, and you can explore more cookie and bar inspirations in my cookie and bar recipes collection.
A Quick Look at This S’mores Cookie Dough Bars Recipe
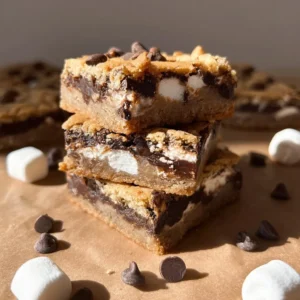
S’mores Cookie Dough Bars layer buttery, brown-sugar cookie dough with molten milk chocolate and pillowy marshmallow fluff, and finish with crunchy broken Digestive biscuits for a textural lift. The standout ingredients are the marshmallow fluff — which gives that signature airy sweetness — and the generous milk chocolate layer, which melts into a silky ribbon. These bars present beautifully when sliced, offering cross-sections of cookie, chocolate, and marshmallow that read as elegant yet comforting. They’re ideal for serving at casual dinner parties or as a decadent afternoon treat, and the method is deliberately forgiving so you’ll get restaurant-worthy results with home-kitchen confidence. Keep reading to master the layering technique that makes every square feel like a small, portable s’more.
Ingredients You’ll Need for S’mores Cookie Dough Bars
Making elevated baking starts with trustworthy ingredients. Below I’ve broken everything into essentials, optional accents, and sensible substitutions so you can adapt the recipe to what’s in your pantry while preserving the taste and texture you expect.
Essentials
- 225g unsalted butter, softened — Use real butter for a rich, browned-sugar aroma; room temperature ensures smooth creaming and an even texture.
- 150g light brown sugar — Light brown sugar provides moistness and that molasses warmth that makes cookie dough taste irresistible.
- 75g granulated sugar — Balances the brown sugar and helps achieve a crisp top once baked.
- 2 large eggs — Bind the dough and lend structure; room-temperature eggs incorporate more uniformly.
- 1 tsp vanilla extract — A small measure that brightens flavors and deepens the chocolate notes.
- 270g plain flour — All-purpose flour is perfect here — it gives structure without making the bars cakey.
- 1 tsp bicarbonate of soda — Provides a gentle lift so the bars don’t become dense.
- 1 tsp salt — Enhances sweetness and balances the flavors.
- 200g chocolate chips + 20g for the top — Use good-quality milk or semi-sweet chocolate chips; reserve the extra chips to create an enticing mosaic on top.
- 100g Digestive biscuits, broken — These add a pleasant, biscuit-like crunch; break them into medium pieces so they remain distinguishable in the dough.
- 2 x 200g milk chocolate bars — These create the thick, melty chocolate layer that defines the s’mores feel.
- 1/2 tub marshmallow fluff — The airy marshmallow center — warm and gooey after baking — is what transforms cookie bars into s’mores-inspired delights.
Optional Add-ons
- Flaky sea salt for finishing — A light sprinkle just before serving heightens the chocolate’s flavor and adds a sophisticated contrast.
- Toasted chopped hazelnuts or pecans — A rustic nutty note adds crunch and complexity; toast briefly in a dry pan until fragrant.
- A drizzle of caramel or dulce de leche — For a salted-caramel twist that pairs beautifully with milk chocolate.
- A few squares of dark chocolate cut into shards — Interspersed with the milk chocolate, dark pieces add a bittersweet counterpoint.
- Toasted marshmallows (mini) on top — Quick to torch or broil for a charred-sugar finish if you want an authentic campfire aroma.
Substitutions and Shortcuts
- Butter — If you only have salted butter, reduce added salt by half to compensate. For a slightly softer texture, use 50/50 butter and vegetable shortening, but note the flavor will be less rich.
- Plain flour — A 1:1 gluten-free flour blend can substitute; expect a slightly different texture and check doneness earlier.
- Digestive biscuits — Graham crackers are a classic stand-in and will bring a similar biscuity sweetness.
- Marshmallow fluff — Use an equal weight of mini marshmallows if you prefer; they’ll melt differently and may require a slightly longer bake to get gooey.
- Milk chocolate bars — Use any chocolate you love; for a more intense chocolate flavor, swap one milk chocolate bar for a dark chocolate bar.
- Quick shortcut — If short on time, press pre-made cookie dough (shop-bought or leftover) into the tin for the base and top layers, but still layer with chocolate and marshmallow for the full effect.
How to Make S’mores Cookie Dough Bars Step-by-Step
I’ve refined this method to give you clarity at each stage: where to be gentle, where to be decisive, and why certain textures matter. You’ll find the technique straightforward, but it’s the small choices — creaming properly, layering evenly, and timing the bake — that create a standout result.
Prepare the pan and oven
- Preheat your oven to 150°C (300°F). Grease an 8×8-inch (20×20 cm) square tin with butter or line it with parchment, leaving an overhang on two sides for easy lifting. A lower baking temperature allows the marshmallow center to remain soft while the cookie dough browns gently.
Cream butter and sugars
- In a large mixing bowl, beat the softened butter with the light brown sugar and granulated sugar until the mixture is smooth, pale, and slightly fluffy. I use a handheld mixer on medium speed for about 2–3 minutes; creaming incorporates air that helps the top finish with a tender but crisp crumb.
Add the eggs and vanilla
- Beat in the eggs, one at a time, ensuring each is fully incorporated before adding the next. Stir in the vanilla extract. This step creates a cohesive batter and prevents curdling — a smooth, homogenous dough will bake more evenly.
Combine dry ingredients
- In a separate bowl, whisk together the plain flour, bicarbonate of soda, and salt. Whisking distributes the leavening and salt evenly so you don’t end up with pockets of flavor. Gradually add the dry mixture to the creamed mixture, folding gently until just combined. Avoid overworking the dough; overmixing can develop gluten and make the bars tough.
Fold in chocolate chips and Digestive biscuits
- Fold in 200g of chocolate chips and the broken Digestive biscuits until dispersed. The biscuits add bursts of texture that contrast with the soft marshmallow and the dough. Keep some biscuit pieces larger and some finer for variety.
Press half the dough into the tin
- Transfer roughly half the cookie dough to the prepared tin. Using an offset spatula or your hands (lightly greased), press it into an even, compact layer that reaches the corners. Pressing firmly creates a sturdy base that supports the chocolate and marshmallow without spilling.
Add the chocolate and marshmallow layers
- Break the two 200g chocolate bars into pieces and arrange them in an even layer over the dough. Dollop half a tub of marshmallow fluff over the chocolate and spread gently; it doesn’t need to be perfectly smooth — irregularities will turn into delicious pockets of marshmallow when baked. If you’re using mini marshmallows, distribute them evenly.
Finish with remaining dough and chips
- Drop spoonfuls of the remaining cookie dough over the marshmallow, then press lightly to create an even top layer. It’s okay if the top isn’t perfectly flat; it should be rustic. Sprinkle the reserved 20g of chocolate chips across the top for a decorative finish.
Bake until set but tender
- Bake in the preheated oven for 35–45 minutes. You’re aiming for a top that’s golden brown and a center that no longer wobbles when you gently shake the pan; the marshmallow will still be soft. The lower oven temperature helps prevent the marshmallow from bubbling out or burning while the cookie finishes baking.
Cool and slice with care
- Allow the bars to cool in the tin for at least an hour. The marshmallow firms slightly as it cools, making slicing cleaner. Use the parchment overhang to lift the slab from the tin, and slice with a sharp knife; wipe the blade clean between cuts for neat squares. Let the bars come to room temperature or serve slightly warm for a gooier interior.
Tips as you bake:
- If the top browns too quickly, tent loosely with foil for the final 10–15 minutes.
- For a toasted finish on the marshmallow, pop the cooled bars under a hot broiler for 20–45 seconds, watching closely.
- I often make these a day ahead; flavor deepens after resting and they’re easier to slice cold.
For more ideas on cookie-bar techniques and presentation, take a look at this collection of cookie and bar recipes — it’s a handy resource when you want to adapt textures or mix-ins.
Common Mistakes to Avoid
Baking is a small-steps craft: tiny missteps can change texture or appearance, but each is an easy lesson. Think of these common mistakes as part of the learning curve — correct them once, and your bars will be reliably brilliant from then on.
Mistake 1: Overworking the Dough
When you overmix once the flour is added, gluten develops and the final bars can become dense or chewy rather than tender. Fold the dry ingredients in with a light hand until just combined; a few streaks of flour are better than a rubbery texture.
Mistake 2: Skipping the Firm Base
Not pressing the bottom layer evenly or firmly can cause the chocolate and marshmallow layers to shift or break through during baking. Use an offset spatula or lightly greased hands to compact the base into a uniform layer that reaches the corners — it creates the structural contrast that makes each bite satisfying.
Mistake 3: Baking at Too High a Temperature
A high oven can brown the top before the marshmallow and inner dough have set, leading to pockets of raw marshmallow or melted chocolate that leak. Stick to 150°C (300°F) as specified, and tent with foil if the surface colors too quickly. Patience here keeps the interior soft and the top gently golden.
Serving Suggestions for S’mores Cookie Dough Bars
These bars are inherently nostalgic, so think about serving that honors both the rustic and refined aspects: warm, slightly messy, and utterly indulgent. Here are three approaches that will elevate the experience whether you’re entertaining or treating yourself.
Elegant Party Platter
Arrange the bars on a slate or wooden board, cut into uniform squares, and sprinkle with a pinch of flaky sea salt. Add a small ramekin of extra chocolate chips or chocolate shavings and a bowl of toasted nuts. This makes the plate feel curated — guests can choose their finishing touch.
Casual Coffee Companion
Serve a warm square alongside a small cup of espresso or a milky latte. The rich chocolate and marshmallow balance the coffee’s acidity — it’s a luxurious, approachable pairing that turns an ordinary coffee break into a mini celebration.
After-Dinner Dessert
Plate a single bar with a quenelle of vanilla bean ice cream or a scoop of salted caramel gelato. A quick torch of the marshmallow top adds drama and a smoky aroma. The contrast of warm bar and cold ice cream is irresistible and feels like a plated, restaurant-style dessert.

Conclusion
I love how these S’mores Cookie Dough Bars transform a handful of everyday pantry ingredients into something both nostalgic and sophisticated — a dessert that looks impressive yet is perfectly doable at home. They’re forgiving to make, endlessly adaptable to personal tastes, and rewarding to share; once you master the layering and low-and-slow bake, you’ll find it simple to riff with nuts, different chocolates, or a salted caramel finish for variety. For a visual tutorial and an alternative take on s’mores-style bars, I often turn to the clear step-by-step guidance found in this S’mores Cookie Bars recipe and video, and for more creative presentations and inspiration I recommend the ideas in this S’mores Cookie Bars post. Try making the bars once and you’ll see how confidently delicious they are — then make them again with a personal twist.
FAQs About S’mores Cookie Dough Bars
I store leftovers in an airtight container at room temperature for up to 2 days. If you prefer firmer bars, refrigerate them for up to 4 days; bring to room temperature or warm briefly before serving to soften the marshmallow.
Yes — wrap individual squares tightly in plastic wrap and place them in a freezer-safe container for up to 2 months. Thaw in the refrigerator overnight and warm gently in a low oven or microwave for a few seconds to revive the marshmallow softness.
Absolutely. I often bake them a day ahead; flavors meld and the bars slice more cleanly once cooled. If serving warm, reheat briefly in a 150°C (300°F) oven for 8–10 minutes.
You can substitute a 1:1 gluten-free flour blend for the plain flour and use gluten-free Digestive-style biscuits. Texture may be slightly different, but the flavor will remain indulgent.
Chill the slab for an hour or refrigerate until firm before slicing; use a sharp knife warmed under hot water, wipe the blade between cuts, and press straight down rather than sawing to maintain neat edges.
S’mores Cookie Dough Bars
Ingredients
Essentials
- 225 g unsalted butter, softened Use real butter for a rich, browned-sugar aroma.
- 150 g light brown sugar Provides moistness and molasses warmth.
- 75 g granulated sugar Balances the brown sugar.
- 2 large eggs Room temperature for better incorporation.
- 1 tsp vanilla extract Brightens flavors.
- 270 g plain flour All-purpose flour is perfect.
- 1 tsp bicarbonate of soda Provides lifting.
- 1 tsp salt Enhances sweetness.
- 200 g chocolate chips Use good-quality milk or semi-sweet.
- 20 g chocolate chips Reserved for topping.
- 100 g Digestive biscuits, broken Adds crunch.
- 2 200g milk chocolate bars Creates the melty chocolate layer.
- 1/2 tub marshmallow fluff Transforms cookie bars into s’mores delights.
Optional Add-ons
- to taste flaky sea salt For finishing touch.
- to taste toasted chopped hazelnuts or pecans Adds a nutty note.
- to taste drizzle of caramel or dulce de leche For added flavor.
- to taste dark chocolate cut into shards For bittersweet contrast.
- to taste toasted marshmallows (mini) on top For charred-sugar finish.
Instructions
Preparation
- Preheat your oven to 150°C (300°F). Grease an 8×8-inch (20×20 cm) square tin with butter or line it with parchment.
Mixing Ingredients
- In a large mixing bowl, beat the softened butter with light brown sugar and granulated sugar until smooth.
- Beat in the eggs, one at a time, then stir in the vanilla extract.
- In a separate bowl, whisk together flour, bicarbonate of soda, and salt.
- Gradually add the dry mixture to the creamed mixture, folding gently.
- Fold in chocolate chips and broken Digestive biscuits.
Layering and Baking
- Transfer half the cookie dough to the prepared tin and press into an even layer.
- Break the chocolate bars into pieces and arrange them over the dough. Dollop marshmallow fluff and spread gently.
- Add spoonfuls of remaining dough over the marshmallow and sprinkle reserved chocolate chips on top.
- Bake for 35–45 minutes until the top is golden brown.
Cooling and Slicing
- Allow the bars to cool for at least an hour. Lift from the tin using parchment overhang and slice with a sharp knife.