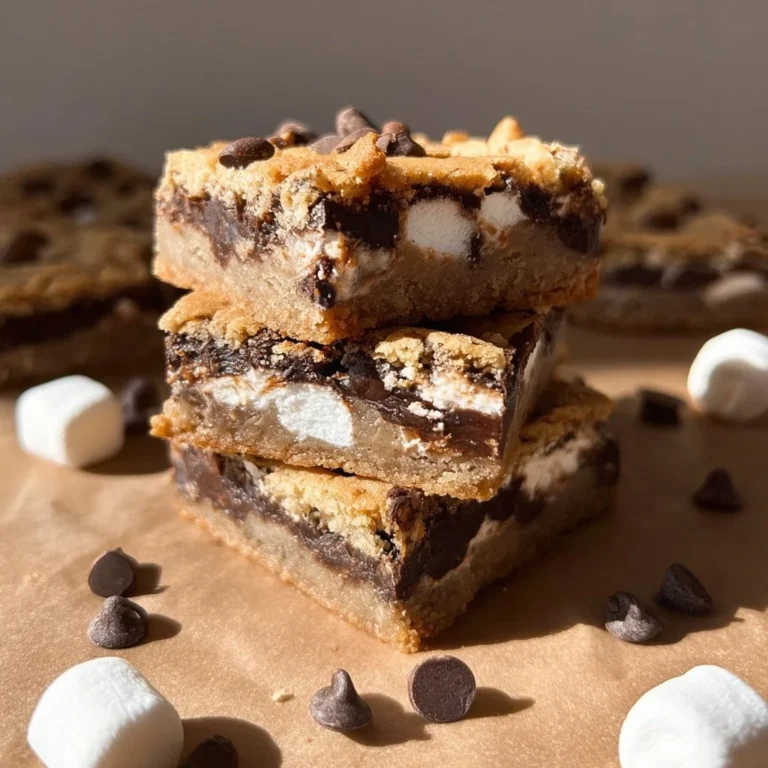
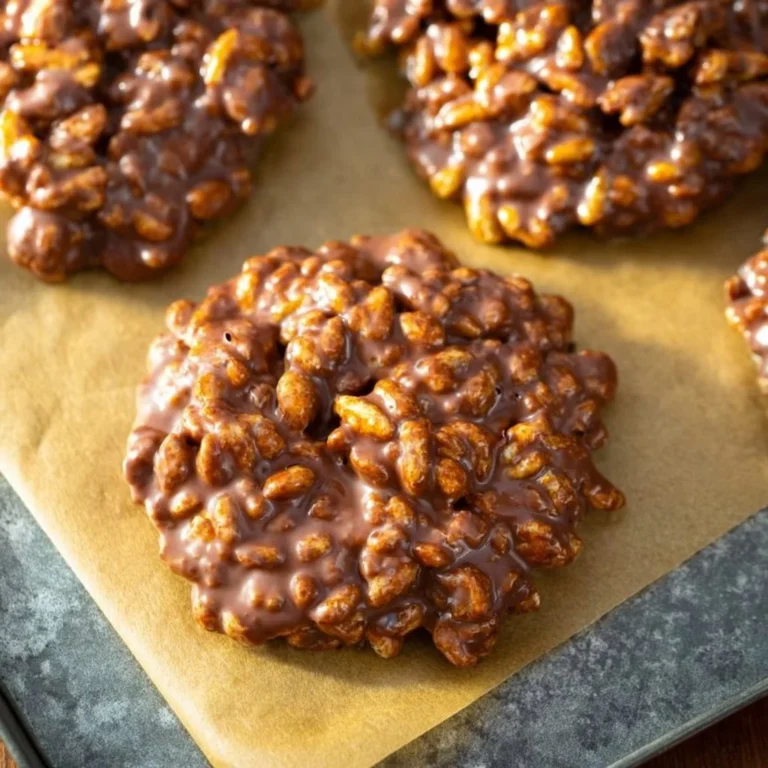
S’mores Blondies
The first bite of these S’mores Blondies should spark the same comfort as a night by a low fire: warm, sweet, and impossibly nostalgic. I know many home cooks hesitate because s’mores feel like an outdoor ritual—campfire, skewers, a little chaos—and blondies sound like something reserved for skilled bakers with perfect timing. Trust me: this recipe turns those memories into something elegant and manageable. With a few thoughtful techniques, you’ll achieve glossy caramel notes, molten chocolate rivers, and pillowy marshmallow pockets—restaurant-quality decadence without fuss.
A Quick Look at This S’mores Blondies Recipe
S’mores Blondies combine the buttery sweetness of blondie batter with the creamy pull of marshmallow and the melty indulgence of milk chocolate bars. The star ingredients—rich brown sugar and a generous layer of milk chocolate paired with marshmallow fluff—give deep caramelized flavor and ooey-gooey texture. These bars are showstoppers on the plate yet surprisingly easy to assemble in under an hour. They’re perfect for gifting, dessert tables, or a cozy night in, and they invite one simple curiosity: how such basic pantry ingredients can yield something so luxuriously nostalgic.
Ingredients You’ll Need for S’mores Blondies
Essentials
- 170 g unsalted butter, softened — I prefer European-style butter for its higher butterfat, which lends a silkier mouthfeel, but any unsalted butter at room temperature will do. Softened (not melted) is key for proper creaming.
- 165 g light brown sugar — full of molasses, this is what gives the blondies that butterscotch, toffee-like depth.
- 100 g granulated sugar — balances sweetness and helps the blondies set with a delicate crust.
- 1 large egg + 1 egg yolk — the egg provides structure; the extra yolk enriches the batter for a tender, fudgy crumb.
- 2 tsp vanilla extract — use pure vanilla for the cleanest, most aromatic lift.
- 215 g plain (all-purpose) flour — measured accurately for a dense yet soft blondie texture.
- 100 g chocolate chips — I use a mix of milk and dark chips for contrast; they melt into pockets of chocolate throughout.
- 450 g milk chocolate bars — these become the molten layer. Choose a chocolate bar you enjoy eating on its own; its flavor will shine through.
- 1 tub (213 g) marshmallow fluff — the store-bought fluff gives that classic s’mores texture without the need for a torch.
Optional Add-ons
- Crushed graham crackers (30–50 g) — sprinkle a thin layer over the first batter for a crunchy, toasty graham note reminiscent of the original s’more.
- Flaky sea salt — a few pinches on top after baking heighten the chocolate and caramel tones.
- Toasted chopped hazelnuts or pecans (50–75 g) — for a nutty counterpoint and textural interest.
- Mini marshmallows (a handful) — for extra toasted pockets if you want a more rustic, campfire-like appearance.
- A thin ribbon of caramel or dulce de leche — lightly drizzled between layers for an ultra-luxe bite.
Substitutions and Shortcuts
- Butter: If all you have is salted butter, reduce added salt elsewhere and be mindful of extra saltiness. Salted butter is an acceptable swap in a pinch.
- Brown sugar: If you only have dark brown sugar, use it; the blondies will be slightly deeper in flavor. If you have only white sugar, add 1–2 tablespoons of molasses per cup to mimic brown sugar.
- Marshmallow fluff: Use mini marshmallows melted briefly on the stovetop or under the broiler if you prefer a toasted top—watch them carefully. Fluff is the time-saving, consistent option.
- Milk chocolate bars: You can use chocolate chips or chopped chocolate bars instead; chop into thicker pieces to recreate the melt-through layer. Dark chocolate will produce a less sweet, more sophisticated version.
- Flour: For a slightly softer blondie, replace 25 g of the flour with almond flour—this adds tenderness but will change the texture slightly.
- Pre-mixed: Use store-bought blondie or cookie dough as a shortcut—press half into the tin, add fillings, and top with the remaining dough for a very quick fix.
How to Make S’mores Blondies Step-by-Step
I’ll walk you through each stage so you understand not just what to do, but why it matters.
Preheat and prepare
- Preheat your oven to 180°C (160°C fan). Line an 8×8-inch (20×20 cm) baking tin with parchment, leaving an overhang on two sides for easy removal. Preheating ensures even rising and proper caramelization; the parchment makes lifting and slicing clean and elegant.
Cream the butter and sugars
- In a large bowl, beat the softened butter with the light brown sugar and granulated sugar until the mixture is smooth and pale, about 2–3 minutes with an electric mixer (or a little longer by hand). Creaming incorporates tiny air pockets that give the blondies a tender lift and helps distribute the brown sugar’s molasses flavor evenly.
Add egg and vanilla
- Beat in the large egg and egg yolk until fully combined, then stir in the vanilla extract. The extra yolk enriches the batter for a fudgier center; make sure each addition is mixed thoroughly so the batter is uniform.
Fold in the flour
- Gradually add the plain flour and stir until just combined. Overmixing develops gluten and can make the blondies tough; you want a homogenous, slightly thick batter without streaks of flour.
Incorporate the chocolate chips
- Fold in the chocolate chips gently so they’re evenly distributed. These chips will create pockets of chocolate inside the blondie, giving textural contrast to the larger chocolate bar layer.
Build the layers
- Spoon and spread half of the batter into the prepared tin, smoothing it into an even layer. This first layer is the foundation; if it’s uneven, the middle could bake inconsistently.
- Arrange the milk chocolate bars over the batter in a single layer. Depending on the size of your bars, you can break them into pieces—overlapping slightly is fine. Dollop the marshmallow fluff over the chocolate bars in three or four generous spoonfuls and use an offset spatula or the back of a spoon to spread the fluff into a loose layer. The fluff will melt into pockets and create that iconic gooey center.
Top with remaining batter
- Gently drop spoonfuls of the remaining batter over the marshmallow layer and use a spatula to coax it into a relatively even layer. Don’t worry if the top isn’t perfectly smooth; some of the marshmallow will peek through and caramelize attractively.
Bake with care
- Bake for about 25 minutes, or until the edges are golden and set but the center still has a slight wobble when you gently shake the pan. The blondies continue to set as they cool, so err on the side of underbaking rather than overbaking for a fudgier texture.
Cool completely before slicing
- Allow the blondies to cool fully in the tin—at least an hour at room temperature—before using the parchment overhang to lift them out and cut them into squares. Cooling gives the marshmallow and chocolate time to firm up so you get clean slices rather than a sticky mess.
Tips in action:
- If your marshmallow rises and browns too much on top, tent the pan loosely with foil halfway through baking.
- For a lightly toasted top, brief broiling for 30–60 seconds can add color—watch closely to avoid burning.
Common Mistakes to Avoid
Baking is as much about timing and feel as it is about ingredients. I’ve found that most disappointing results come from a few predictable missteps—once you know them, you can avoid them easily and confidently.
Mistake 1: Overmixing the batter
Overworking the flour develops gluten and yields a dense, chewy bar rather than a tender, fudgy blondie. Mix just until the flour disappears, and fold in the chocolate chips by hand. Your batter should feel thick and slightly glossy, not elastic or springy.
Mistake 2: Baking too long
The difference between a perfectly gooey center and a dry, cake-like square often comes down to minutes. Pull the blondies when the edges are set and the center still jiggles slightly. They will firm during cooling and carry a sumptuous fudginess that’s the hallmark of a great blondie.
Mistake 3: Cutting too soon
It’s tempting to slice into warm, molten bars, but patience pays off. Cutting before full cooling can leave you with a sticky, uneven presentation. Let the pan cool completely so the chocolate and marshmallow layers can stabilize for neat, confident slices.
Serving Suggestions for S’mores Blondies
These blondies are indulgent on their own, but small presentation choices can elevate them into a memorable dessert centerpiece. Think contrast—warm and gooey against crisp and cool—so each bite feels balanced and thoughtfully composed.
Elegant individual servings
Cut the blondies into generous squares and serve one perched on a small dessert plate with a quenelle of vanilla bean ice cream and a dusting of finely crushed graham cracker. The cold ice cream tempers the richness; the crumb adds structure.
Family-style platter
Arrange the squares on a wooden board layered with parchment for casual entertaining. Scatter toasted hazelnuts, a few extra broken chocolate pieces, and a sprinkle of flaky sea salt across the top. This rustic presentation invites sharing and conversation.
Warm and toasty finishing touches
For a café-quality finish, lightly torch the top of each square to caramelize the marshmallow, or place them briefly under a hot broiler. Serve warm with a small shot of espresso or a robust black tea to cut through the sweetness.

Conclusion
I believe S’mores Blondies are proof that nostalgia and refinement can coexist beautifully in the same dessert. This recipe gives you buttery blondie richness, molten milk chocolate, and those irresistible marshmallow pockets—deliciously impressive yet entirely achievable in a home kitchen. It’s flexible: swap in nuts, add a graham-cracker layer, or sprinkle flaky salt to make the bars your own. Make a pan for friends, bring a tray to a potluck, or savor a solitary square with tea—each option is satisfying and confidence-building.
For further inspiration and variations, I often look to creative bakers: one useful take on the concept is available from Broma Bakery’s S’mores Blondies, and there’s another lovely approach at Buttermilk by Sam’s S’mores Blondies. Try a version that speaks to you, then adapt with your favorite chocolate or a handful of nuts—the technique remains forgiving and rewarding.
FAQs About S’mores Blondies
Store S’mores Blondies in an airtight container at room temperature for up to 2 days; for longer storage, refrigerate up to 5 days. If chilled, bring them to room temperature or microwave briefly (5–8 seconds) before serving to revive the marshmallow and chocolate softness.
Yes. Bake and cool completely, then store in the refrigerator. Bring them out an hour before serving to approach the ideal texture, or warm individual squares for a few seconds in the microwave for that just-baked experience.
Absolutely. Wrap cooled bars tightly in plastic wrap and layer in a freezer-safe container separated by parchment for up to 3 months. Thaw overnight in the refrigerator and bring to room temperature before serving, or warm gently.
Yes. Milk chocolate keeps the bars sweet and nostalgic, while dark chocolate adds complexity and less sweetness. White chocolate will change texture slightly—use it sparingly or mixed with other chocolates for balance.
Place the baked blondies under a very hot broiler for 30–60 seconds, watching the marshmallow closely until it blisters and caramelizes. Alternatively, briefly blowtorch individual squares or serve with a thin layer of mini marshmallows and torch them just before serving.

S’mores Blondies
Ingredients
Essentials
- 170 g unsalted butter, softened European-style butter preferred for a silkier mouthfeel.
- 165 g light brown sugar Provides butterscotch, toffee-like depth.
- 100 g granulated sugar Balances sweetness and helps the blondies set.
- 1 large egg Provides structure.
- 1 large egg yolk Enriches the batter for a tender crumb.
- 2 tsp vanilla extract Use pure for best flavor.
- 215 g plain (all-purpose) flour Measured accurately for texture.
- 100 g chocolate chips A mix of milk and dark for contrast.
- 450 g milk chocolate bars Choose a chocolate bar you enjoy.
- 213 g marshmallow fluff Store-bought for convenience.
Optional Add-ons
- 30–50 g crushed graham crackers For a crunchy, toasty graham note.
- flaky sea salt For enhancing flavors.
- 50–75 g toasted chopped hazelnuts or pecans Adds nutty flavor.
- mini marshmallows For extra toasted pockets.
- caramel or dulce de leche For an ultra-luxe bite.
Instructions
Preparation
- Preheat your oven to 180°C (160°C fan) and line an 8×8-inch (20×20 cm) baking tin with parchment.
- In a large bowl, beat the softened butter with the light brown sugar and granulated sugar until smooth and pale, about 2–3 minutes.
- Beat in the large egg and egg yolk until fully combined, then stir in the vanilla extract.
- Gradually add the plain flour and stir until just combined, avoiding overmixing.
- Fold in the chocolate chips gently so they’re evenly distributed.
Layering and Baking
- Spread half of the batter into the prepared tin.
- Arrange the milk chocolate bars over the batter and dollop marshmallow fluff on top.
- Spread the remaining batter over the marshmallow layer.
- Bake for about 25 minutes or until the edges are golden, and the center wobbles slightly.
Cooling and Slicing
- Allow the blondies to cool fully in the tin for at least an hour before cutting.