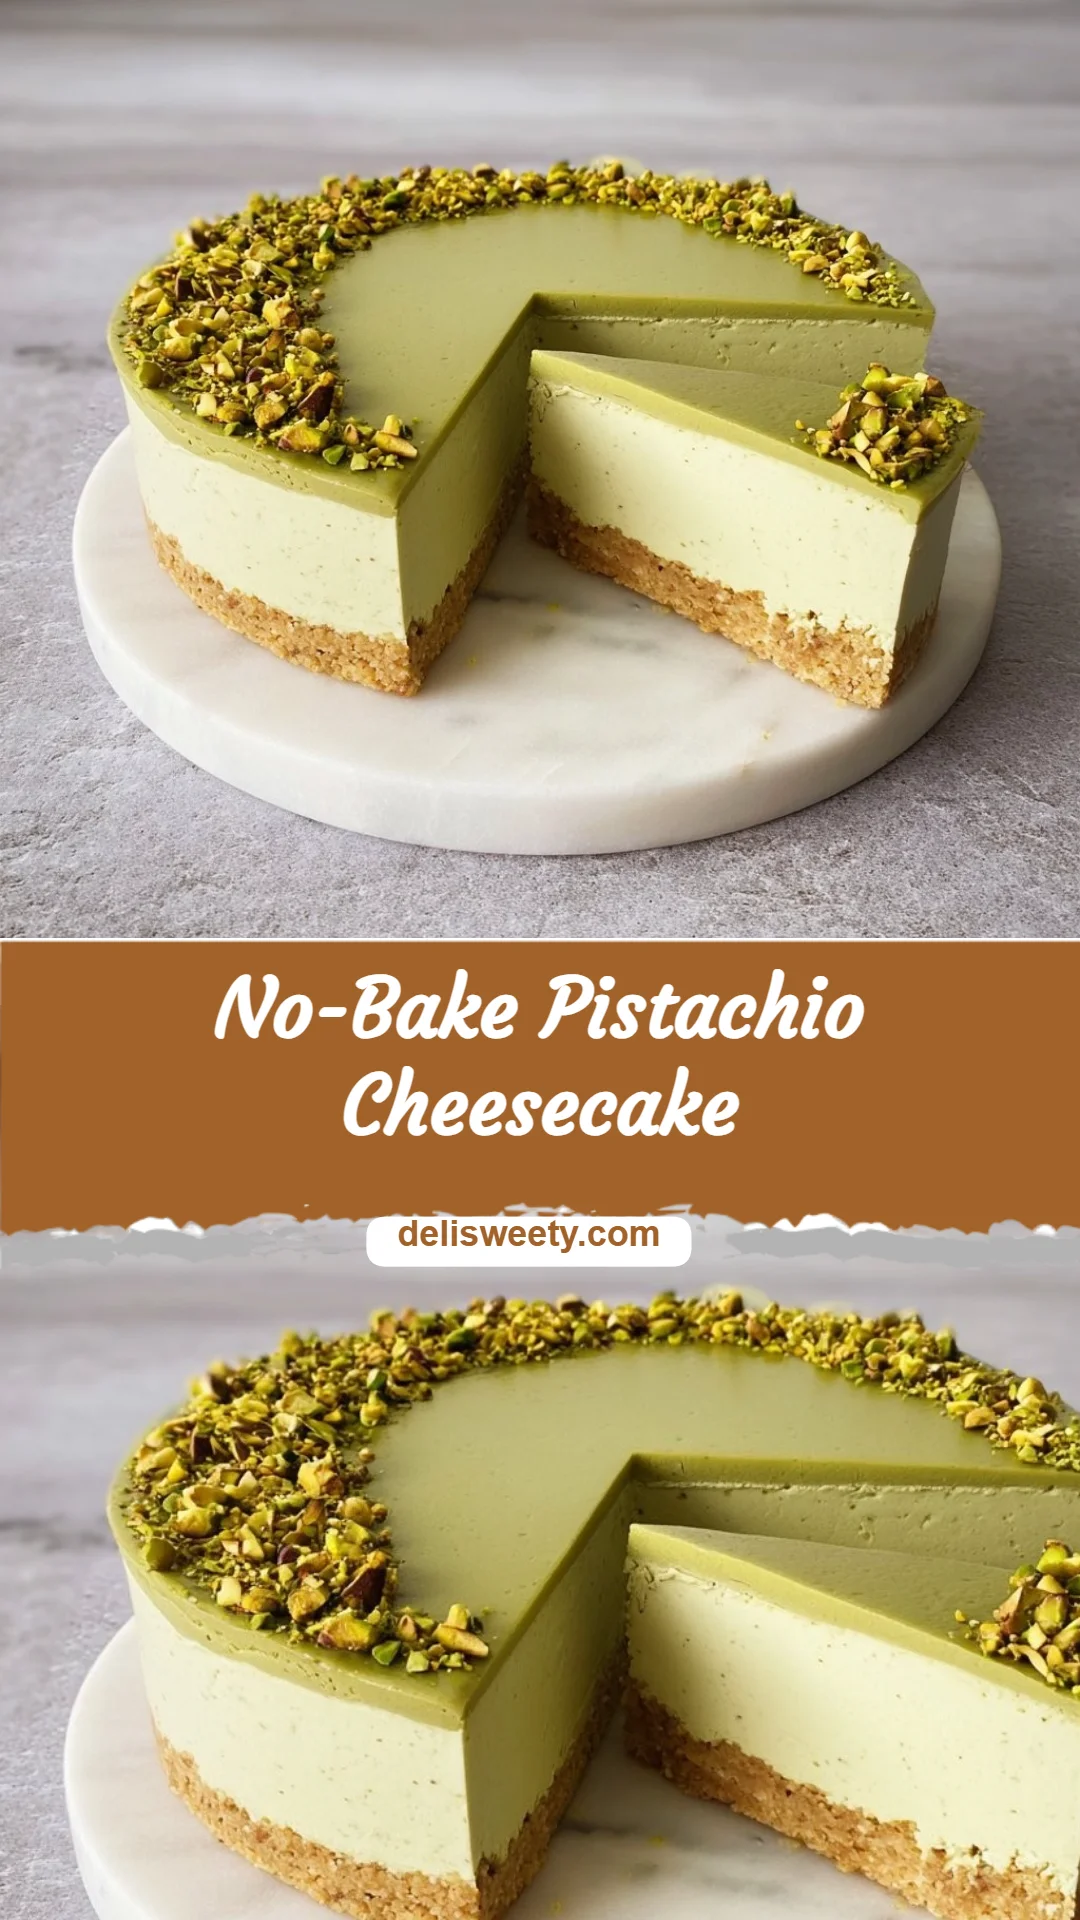
No-Bake Pistachio Cheesecake
I can still remember the first time I tasted pistachio in a silky, chilled cheesecake—the subtle, nutty perfume that lifts the creaminess and a tender crumb that whispered of butter and toasty biscuits. It’s the kind of dessert that feels refined yet comforting, the sort you imagine served on a quiet dinner table with linen and soft music. If you hesitate because you think cheesecakes are technical, time-consuming, or fussy, relax: this No-Bake Pistachio Cheesecake is proof that restaurant-worthy results don’t require an oven or advanced pastry skills. I’ll walk you through a simple, elegant method that yields a glossy, sliceable cake; and if you want other make-ahead treats to pair with it, you can explore my favorite no-bake recipes collection for inspiration.
A Quick Look at This No-Bake Pistachio Cheesecake Recipe
This No-Bake Pistachio Cheesecake shines on two defining flavors: the rich, nutty depth of pistachio spread and the warm, buttery crunch of a digestive-biscuit base. It’s one of those desserts that reads as decadent on a menu but is deceptively approachable—no baking, minimal equipment, and a forgiving assembly process. The finished cake is smooth, luxuriously creamy, and elegantly dressed with a glossy pistachio topping and a ring of chopped nuts for texture. It’s especially suited to dinner parties or celebrations because it can be made a day ahead and looks every bit as impressive as it tastes. Keep reading—the method is straightforward, but a few chef’s tricks will make every slice sing.
Ingredients You’ll Need for No-Bake Pistachio Cheesecake
I recommend measuring and setting out your ingredients before you begin—this keeps the process calm and ensures a silky, stable finish.
Essentials
- 300g digestive biscuits, finely crushed — choose a good-quality biscuit for better flavor and structure. Crushing them to an even, fine texture helps the crust bind and creates a smooth base.
- 150g salted or unsalted butter, melted — if you use unsalted butter, a pinch of fine sea salt stirred into the crumbs brightens the flavor.
- 500g full-fat cream cheese, at room temperature — full-fat gives the cheesecake its creamy body. Softening it to room temperature ensures smooth mixing without lumps.
- 300ml double cream — this is whipped to give the filling lift and an airy, mousse-like texture.
- 120g icing sugar — superfine sweetness that dissolves easily into the cream cheese.
- 100g pistachio spread — this is the flavor anchor in the filling; choose one with real pistachio paste for the best aroma.
- 150g–200g pistachio spread, melted (for topping) — slightly extra pistachio spread, warmed until pourable, creates a glossy finish.
- 2 tbsp chopped pistachios — for crunch and visual contrast; use shelled, unsalted pistachios and chop them finely for an elegant rim.
Optional Add-ons
- A teaspoon of vanilla extract — adds warmth and rounds the pistachio flavor.
- Zest of half a lemon — a whisper of lemon zest in the crust or filling can lift the sweetness and introduce a fresh counterpoint.
- A pinch of flaky sea salt — sprinkled on the finished top, it makes the sweetness and nutty notes pop.
- A tablespoon of brown butter in the crust — for a toasty, caramel nuance if you want more depth.
- A thin drizzle of white chocolate — for extra luxury, use a little white chocolate swirled on top before the pistachio topping sets.
Substitutions and Shortcuts
- Digestive biscuits: Graham crackers (US) or plain tea biscuits work fine. If you like extra flavor, use almond meal (replace up to 50g of the crumbs) to intensify the nut profile.
- Butter: Use clarified butter/ghee for a more intense, nutty aroma. If you must, a neutral vegetable oil can bind crumbs, though the flavor will be less rich.
- Full-fat cream cheese: Mascarpone can be used for a silkier, more refined filling—use 400g mascarpone plus 100g cream cheese if you prefer a softer tang.
- Double cream: Heavy whipping cream (US heavy cream) is a direct substitute. For a lighter version, replace 50ml with Greek yogurt, but expect a slightly tangier finish.
- Pistachio spread: If you can’t find a paste-based spread, make a quick nut butter by blitzing 120g shelled pistachios with a teaspoon of neutral oil and a pinch of salt until smooth; sweeten lightly with 1–2 tbsp icing sugar.
- No food processor for the crumbs: Place biscuits in a heavy-duty freezer bag and crush them with a rolling pin—alternatively, pulse in a blender.
- Speed up chilling: Freeze the cake for 1–2 hours rather than refrigerating overnight if you’re short on time; just monitor firmness carefully so it doesn’t freeze solid.
How to Make No-Bake Pistachio Cheesecake Step-by-Step
I like to work with a mise en place mentality: have everything at hand and allow yourself to move through the steps calmly. This cake rewards patience more than technique.
Prepare the tin and crust
- Line the base and sides of an 8-inch (20cm) springform tin with parchment paper. This makes it easier to release the cheesecake later and protects the sides from condensation.
- Finely crush the digestive biscuits until they resemble coarse sand. The finer the texture, the neater the slice will be. If using a plastic bag and rolling pin, work in short bursts so the bag doesn’t split.
- Stir the melted butter into the biscuit crumbs until thoroughly combined; the mixture should hold together when pressed between your fingers. This is the glue that gives you a clean base.
- Tip the crumb mixture into the prepared tin and press it down evenly with the back of a spoon or the base of a glass, forming a compact, level crust about 1cm thick. A compact crust supports the delicate filling and helps create those impressive, clean slices.
Make the pistachio cream cheese filling
- In a large bowl, whisk the room-temperature cream cheese, icing sugar, and 100g pistachio spread on low speed with an electric mixer until just combined. You want a smooth, homogeneous mixture—overmixing at this stage can warm the cheese and make the texture runny.
- In a separate chilled bowl, whip the double cream to stiff peaks. Watch carefully: stiff peaks provide structure, giving the filling body without becoming heavy.
- Fold one-third of the whipped cream into the cream cheese mixture gently to loosen it. Then fold in the remaining cream with broad, sweeping motions. The goal is to preserve as much air as possible while creating a uniform, pillowy texture.
Assemble and chill
- Spoon the filling over the prepared crust and smooth the top with an offset spatula or the back of a spoon. A small offset spatula gives the most control and a professional finish.
- Refrigerate the assembled cheesecake for at least 6 hours, but overnight is ideal. This chilling time allows the filling to set and the flavors to marry—pistachio aromatics become more pronounced after resting.
Finish with the glossy pistachio topping
- When the cake has set, gently warm the 150–200g of pistachio spread in the microwave on medium (around 500W) for 20–30 seconds—just until fluid enough to pour. Stir to ensure a glossy, lump-free glaze.
- Finely chop the pistachios for the rim decoration. Toasting them lightly in a dry pan for 2–3 minutes enhances their fragrance but keep watch so they don’t brown too much.
- Carefully release the cheesecake from the springform tin and transfer it to a serving plate. Pour the melted pistachio spread onto the center of the cake and use a palette knife to coax it gently to the edges for an even, mirror-like top.
- Sprinkle the chopped pistachios around the edge for contrast, and return the cheesecake to the fridge for 30 minutes to let the topping firm up. This short cool-down sets the glaze without chilling the filling too hard.
Slice and serve
- For the neatest slices, run a sharp knife under hot water, wipe it dry, and slice the cheesecake in long, decisive strokes—wiping the blade between cuts. Each warm pass gives cleaner edges.
- If you’d like extra showmanship, garnish each slice with a tiny quenelle of whipped cream or a few whole pistachios.
If you’re hungry for more make-ahead showstoppers while the cheesecake sets, I often turn to other chilled desserts in my no-bake dessert ideas collection for complementary flavors and timing.
Common Mistakes to Avoid
Mistakes are simply steps along the path to confidence. I’ve seen the same little missteps repeatedly, and each has an easy fix. Think of these as friendly warnings that will help you get a flawless finish and the texture you’re imagining.
Mistake 1: Overmixing the cream cheese
Overworking the cream cheese with your mixer introduces heat and air that can make the filling runny and grainy. Stop mixing as soon as the sugar and pistachio spread are incorporated; then fold in whipped cream by hand to preserve a silky texture.
Mistake 2: A crumbly or greasy crust
If the biscuit-to-butter ratio is off, the crust may fall apart or feel too greasy. Measure carefully—300g biscuits to 150g butter is balanced. Press the crumbs firmly and chill the tin briefly after pressing if your crumbs feel loose; a chilled crust will set and support the filling.
Mistake 3: Rushing the chilling time
This is a common temptation, especially when a dessert looks ready. The filling needs time for the cream to firm and for flavors to meld; removing it too soon gives a soft, slumping center. Plan ahead and refrigerate at least 6 hours—overnight is best.
Serving Suggestions for No-Bake Pistachio Cheesecake
This cheesecake is elegant yet relaxed: perfect for finishing a dinner party or as the star of a celebratory spread. A thoughtful presentation emphasizes contrast—creamy against crunchy, sweet against nutty, and pale green against golden crumbs.
Slice presentation and plating
Serve each slice on a warmed plate for contrast. A smear of extra melted pistachio spread or a thin ribbon of white chocolate on the plate creates a professional look. Add a small quenelle of softly whipped cream dusted with finely ground pistachios beside the slice for balance.
Pairing and accompaniments
Light fruit compotes—like a gently macerated raspberry or pomegranate reduction—cut through richness with bright acidity, while a shortbread cookie adds an extra buttery crunch. For drinks, a fragrant green tea, an espresso, or a lightly floral white tea complements the nutty character beautifully.
Occasions and timing
Because this cake is made ahead, it’s ideal for dinner parties, picnic-style gatherings (kept cool), or holiday tables where you want a make-ahead showstopper. It also scales well for larger occasions: consider two 8-inch tins or a 9-inch round if you expect larger crowds.
Conclusion
I love how this No-Bake Pistachio Cheesecake manages to be both indulgent and effortless—its silky filling, aromatic pistachio layers, and crisp base make it feel like a restaurant dessert you could serve with confidence. It’s forgiving to make, easy to adapt (try mascarpone for a silkier texture or lemon zest for brightness), and majestic on the table while remaining achievable for a busy home cook. If you want to compare techniques or use a different pistachio spread, this recipe pairs well with inspirations found at No Bake Pistachio Cheesecake | Buttermilk by Sam, and for another approachable take, see Easy No Bake Pistachio Cheesecake Recipe. Try it a day ahead, and I promise you’ll arrive at your gathering calm, prepared, and ready to impress.
FAQs About No-Bake Pistachio Cheesecake
Your No-Bake Pistachio Cheesecake will keep well for 3–4 days refrigerated in an airtight container. The texture remains creamy, though the crust may soften slightly over time—store on a plate covered with plastic wrap or in a cake carrier for best results.
Yes. Freeze the cheesecake unglazed (without the warm pistachio topping) for up to 1 month, wrapped tightly in plastic and then foil. Thaw overnight in the refrigerator, then warm and pour the pistachio topping before serving for the freshest finish.
Absolutely. If you don’t have pistachio spread, blend 120g shelled pistachios with a teaspoon of neutral oil and a tablespoon of icing sugar until smooth, then use that in the filling. The flavor will be more pure-nutty and just as delightful.
For clean slices, chill the cheesecake thoroughly (overnight is ideal). Heat a sharp knife under hot water, dry it, then make a long, single stroke through the cake. Wipe the blade between cuts and reheat it as needed. The warmed blade gives the neatest edge.
Yes—this recipe adapts beautifully to individual servings. Line muffin tins with parchment or use small rings, press in a smaller amount of crust, and reduce chilling time slightly. Mini cheesecakes are perfect for plated desserts or when you want elegant portion control.

No-Bake Pistachio Cheesecake
Ingredients
For the crust
- 300 g digestive biscuits, finely crushed Choose a good-quality biscuit for better flavor.
- 150 g salted or unsalted butter, melted If using unsalted butter, add a pinch of fine sea salt.
For the filling
- 500 g full-fat cream cheese, at room temperature Full-fat gives the cheesecake its creamy body.
- 300 ml double cream Whipped to give the filling lift and an airy texture.
- 120 g icing sugar Superfine sweetness that dissolves easily.
- 100 g pistachio spread Choose one with real pistachio paste for the best flavor.
- 150-200 g pistachio spread, melted (for topping) Warm until pourable for a glossy finish.
- 2 tbsp chopped pistachios For garnish; use shelled, unsalted pistachios.
Optional Add-ons
- 1 tsp vanilla extract Adds warmth and rounds the pistachio flavor.
- 1/2 lemon zest Adds brightness to the sweetness.
- 1 pinch flaky sea salt Enhances sweetness and nutty notes.
- 1 tbsp brown butter Adds a toasty nuance if desired.
- 1 tbsp white chocolate For an extra luxurious topping.
Instructions
Prepare the crust
- Line the base and sides of an 8-inch springform tin with parchment paper.
- Finely crush the digestive biscuits until they resemble coarse sand.
- Stir the melted butter into the biscuit crumbs until thoroughly combined.
- Press the crumb mixture into the prepared tin to form a compact crust.
Make the pistachio cream cheese filling
- In a large bowl, whisk the cream cheese, icing sugar, and pistachio spread on low speed until just combined.
- In a separate chilled bowl, whip the double cream to stiff peaks.
- Fold one-third of the whipped cream into the cream cheese mixture gently and then fold in the remaining cream.
Assemble and chill
- Spoon the filling over the prepared crust and smooth the top.
- Refrigerate the assembled cheesecake for at least 6 hours, ideally overnight.
Finish with the glossy pistachio topping
- Warm the melted pistachio spread until fluid enough to pour.
- Release the cheesecake from the springform tin, pour the melted pistachio spread on top, and sprinkle with chopped pistachios.
- Return the cheesecake to the fridge for 30 minutes to set the topping.
Slice and serve
- Run a knife under hot water, wipe dry, and slice the cheesecake for clean edges.
- Garnish each slice with whipped cream or whole pistachios if desired.