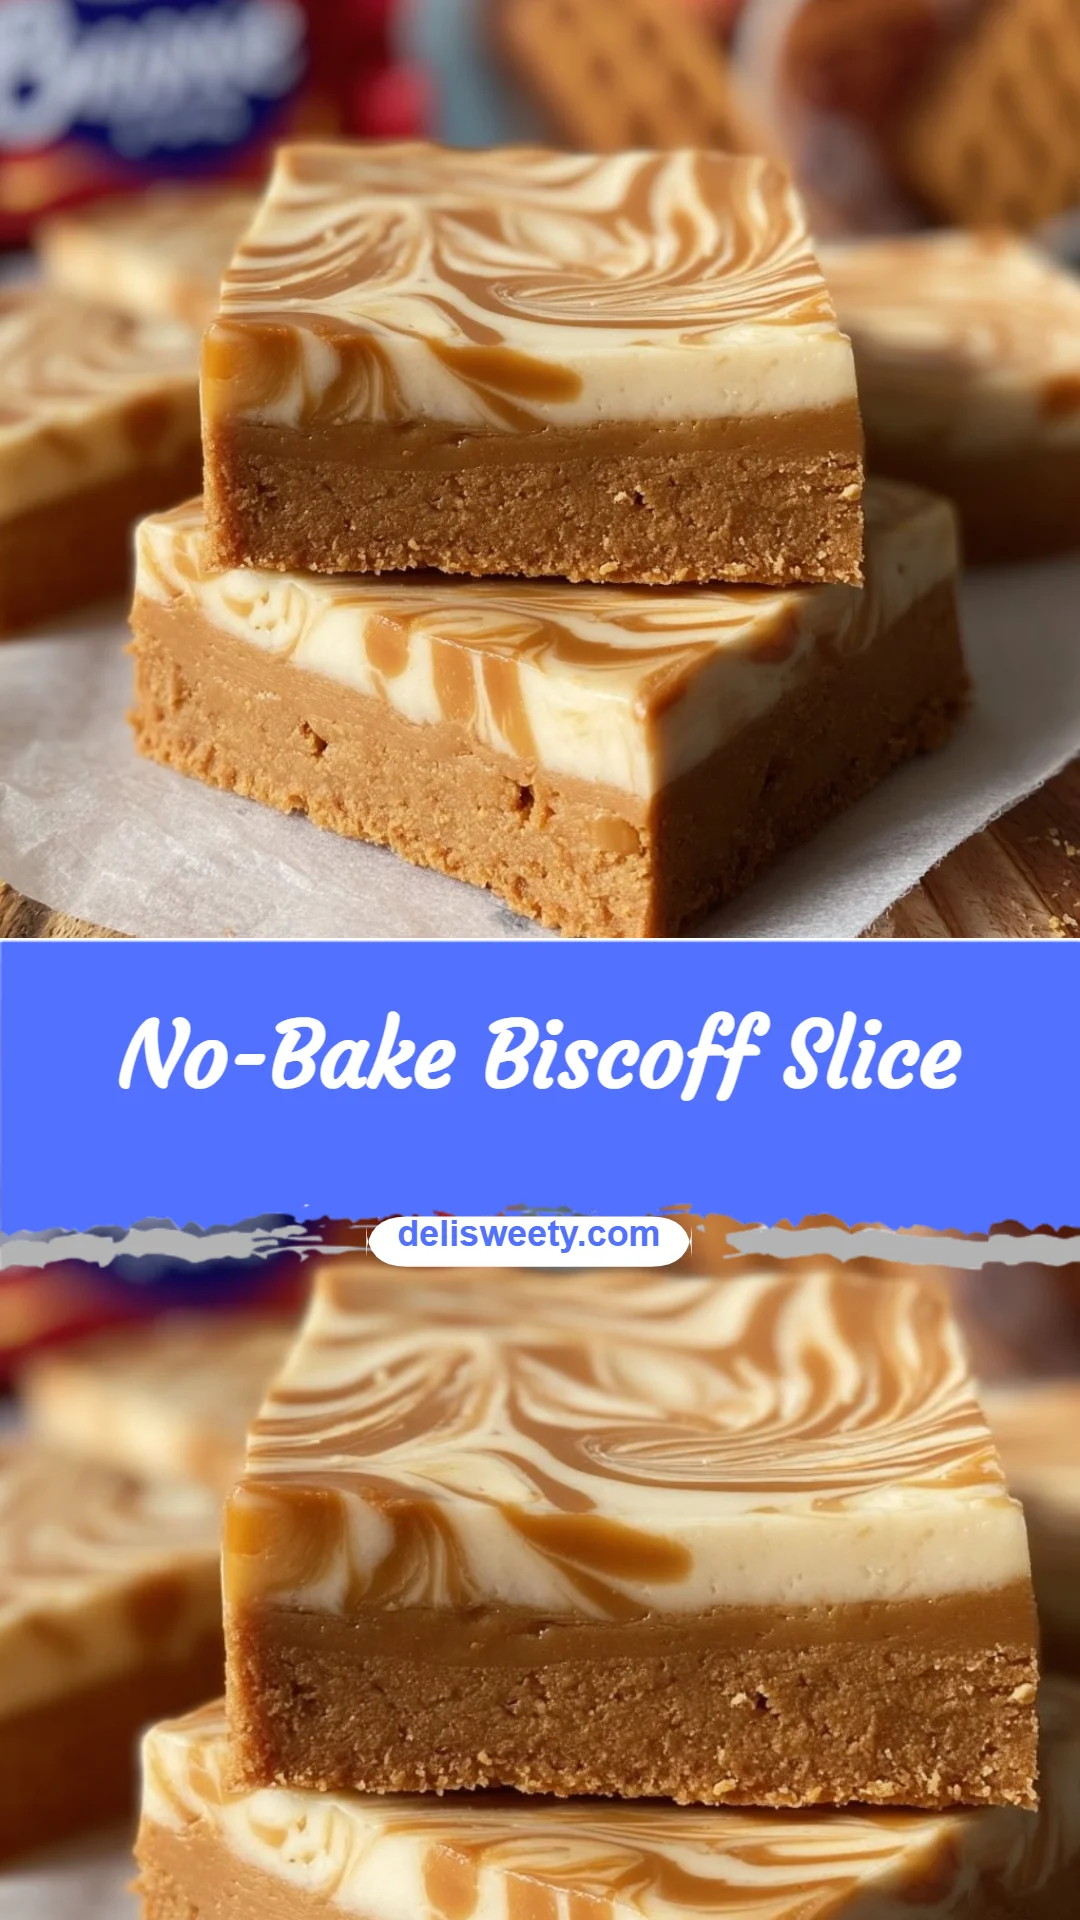
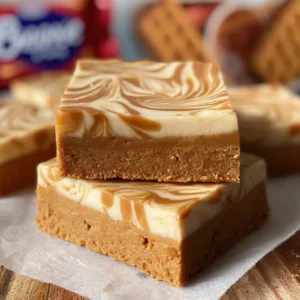
No-Bake Biscoff Slice
There’s a particular comfort in the warm, caramel-tinged whisper of Biscoff — that first bite conjures afternoons of tea, buttery crispness, and a slow, indulgent melt. I understand the hesitation many home cooks feel: recipes that promise “impressive” often demand time, precise technique, or specialized tools. This No-Bake Biscoff Slice answers that worry with elegance and simplicity — a glossy white-chocolate crown, a dense, velvety base of crushed Lotus Biscoff biscuits and spread, and a finish that looks and tastes like something from a patisserie. If you love accessible recipes that feel elevated, you’ll find this slice reliably luxurious and entirely achievable. For more no-bake inspiration that pairs well with this recipe, I often revisit curated collections like this one from my own kitchen library: no-bake recipes.
A Quick Look at This No-Bake Biscoff Slice Recipe
This No-Bake Biscoff Slice pairs two standout ingredients — the spiced, caramelized crunch of Lotus Biscoff biscuits and the silken, branded Biscoff spread — to create a layered flavor profile that’s at once nostalgic and refined. The recipe delivers a stunning presentation: a compact, sliceable base topped with a smooth white-chocolate sheen and a decorative Biscoff swirl. It’s a joyous balance of texture — crisp crumb, creamy body, and a sweet, slightly toasted chocolate top — that performs beautifully on the dessert table. Best of all, the method is forgiving: no oven, minimal tools, and results that feel special yet utterly attainable for home cooks. Read on to learn the small techniques that turn simple ingredients into something memorable.
Ingredients You’ll Need for No-Bake Biscoff Slice
When assembling this recipe, a few quality choices make a dramatic difference. I’ll break down what’s essential, optional flourishes that elevate the dish, and sensible substitutions so the slice retains its charm even when the pantry isn’t perfectly stocked.
Essentials
- 90g Lotus Biscoff biscuits — Choose fresh, crisp biscuits; their aromatic caramel-cinnamon notes are the backbone of the slice.
- 250g icing sugar — Sifted if you can, for a silkier texture in the crumb mixture.
- 120g butter (salted or unsalted) — Use unsalted for precise control, or salted if you enjoy a subtle contrast; melt it gently to bind the crumbs without overheating.
- 249g Biscoff spread — The branded spread has the ideal balance of spice, caramel, and oil for a creamy, cohesive base.
- 50g Biscoff spread for topping — A little extra for marbling over white chocolate adds visual drama and concentrated flavor.
- 200g white chocolate — Choose high-quality white chocolate (not just “white coating”) for a glossy set and clean snap; higher cocoa-butter content gives better shine and mouthfeel.
Optional Add-ons
- Flaky sea salt — A tiny pinch on top after setting brightens the sweetness and enhances the caramel notes.
- Toasted hazelnuts or almonds (finely chopped) — Sprinkle a few on top for crunchy contrast and a toasty aroma.
- A touch of vanilla bean paste — Stir 1/4 teaspoon into the Biscoff spread to lift the flavor and add complexity.
- Dark chocolate drizzle — For a bittersweet counterpoint, thin dark chocolate with a little coconut oil and artistically streak across the white chocolate after it sets slightly.
Substitutions and Shortcuts
- If you can’t find Lotus Biscoff biscuits, speculoos or ginger snaps are the closest substitutes; the spice profile is the key — avoid plain digestive biscuits.
- For a dairy-free version, use a plant-based butter and ensure your white chocolate is dairy-free. The texture will be slightly softer but still very satisfying.
- Short on time? Use a food processor to blitz biscuits and icing sugar together for a super-fine crumb in seconds.
- If you don’t have an 8×8 inch tin, a 20×20 cm tin or similar-sized square pan works — just press the mixture up to the edges for a uniform thickness.
- Want a firmer, sliceable bar faster? Pop the tin in the freezer for 30–45 minutes before cutting. Let slices sit briefly at room temperature before serving for optimal flavor.
I often keep a running list of pantry-friendly no-bake ideas, and one of my favorite places for inspiration is this collection: no-bake recipes.
How to Make No-Bake Biscoff Slice Step-by-Step
This recipe comes together in three calm stages: prepare the crumb base, finish with a glossy white-chocolate top, then chill until firm. I’ll walk you through each phase with the little techniques that turn a simple assembly into a refined slice.
Prepare the Biscuit Base
Crush the Lotus Biscoff biscuits into fine crumbs. I prefer a food processor for speed and uniformity; pulse until the texture resembles fine sand. If you don’t have one, place biscuits in a zip-top bag and bash with a rolling pin, working until there are no large chunks — finer crumbs will bind more easily and yield a smoother slice.
Combine crumbs, icing sugar, and melted butter. Transfer the crumbs to a large bowl, add the icing sugar, then pour in the warm melted butter. The butter should be warm enough to coat but not hot — this prevents the spread from becoming oily or grainy. Stir until every morsel is evenly moistened; the mixture should hold together when pressed between your fingers.
Fold in the Biscoff spread. Warm the 249g of Biscoff spread slightly in the microwave for 10–15 seconds to loosen it for easier incorporation. Use a spatula to fold the spread gently into the crumb mixture until it’s evenly distributed and glossy. The goal is an even, cohesive dough-like consistency that will press neatly into the tin.
Why this matters: Even mixing ensures consistent flavor in every bite and a firm structure that won’t crumble when sliced.
Assemble and Press
Press the mixture into an 8×8 inch tin, smoothing the top. Line the tin with baking paper, leaving a slight overhang to lift the slab out later. Use the back of a spoon or a flat-bottomed measuring cup to press the mixture firmly and evenly into the pan; firm pressure is important — it compresses the crumbs so the slice holds clean edges once set.
Chill briefly before topping (optional). For best results, pop the base in the fridge for 10–15 minutes while you melt the white chocolate; this prevents the butter in the base from softening the chocolate and helps achieve a neat top layer.
Why this matters: Firmly pressing and a short chill help the toppings sit smoothly rather than sinking into the base.
Finish with White Chocolate and Biscoff Swirl
Melt the white chocolate. Break the white chocolate into even pieces and melt gently — using a bain-marie or short bursts in the microwave (20 seconds at a time), stirring between intervals. You want glossy, lump-free chocolate. If it looks thick, add a teaspoon of neutral oil or a little cocoa butter to loosen it slightly for pouring.
Pour and spread the white chocolate over the chilled base. Pour the melted white chocolate over the biscuit layer and use an offset spatula to spread to the edges in a smooth, even coat. Work quickly but calmly; a rapid pour helps avoid streaks and air bubbles.
Drizzle the remaining 50g Biscoff spread and create a marble. Warm the extra Biscoff spread just enough to make it pourable, then use a spoon to add dollops across the white chocolate. With a thin skewer or the tip of a knife, drag through the dollops to create a decorative marbled pattern — little swirls look elegant and artisanal.
Why this matters: The contrast of the glossy white chocolate and warm, swirled Biscoff creates both a striking visual and a layered palate of sweet and spiced caramel.
Chill, Slice, and Serve
Refrigerate until fully set. Chill the tin for at least 2 hours, or until the white chocolate is firm to the touch. For cleaner slicing, chill longer or place in the freezer briefly before cutting.
Cut into squares and enjoy. Lift the slab from the tin using the overhanging parchment and set on a cutting board. Warm a thin-bladed knife under hot water, dry it quickly, and make decisive, single cuts for clean edges. Wipe the knife between cuts for pristine squares.
Why this matters: Proper chilling and a warmed knife are the small rituals that give the slice a polished, restaurant-quality finish.
Common Mistakes to Avoid
I’ve found that the most common errors stem from impatience or uneven temperatures — both easily corrected with a little forethought. Treat these mishaps as simple lessons that make your next batch better.
Mistake 1: Using Overly Warm Biscoff Spread
If the Biscoff spread is too hot when mixed into the crumbs, the fats can separate and make the base oily and loose. Gentle warming is enough — think soft and spreadable, not liquid. If separation happens, chill the mixture briefly and fold again once cool.
Mistake 2: Pouring Chocolate Over a Warm Base
Pouring warmed white chocolate onto an unrefrigerated base can cause the chocolate to sink or streak. Always give the pressed base a short chill so the top layer sets cleanly and remains glossy.
Mistake 3: Cutting Without Chilling or a Clean Knife
Slices will crumble or smear if cut while the slab is warm. Chill thoroughly and use a hot, dry knife to slice; wipe between cuts to maintain neat edges. If you prefer very neat bars, briefly freeze before slicing and allow pieces to rest at room temperature for five minutes before serving.
Serving Suggestions for No-Bake Biscoff Slice
This slice is so versatile it can be dressed for many occasions: a refined finish for a dinner party, a decadent treat with coffee, or elegant squares in a celebration box. Presentation and temperature are key — serve cool but not ice cold to let the flavors unfurl.
Casual Coffee or Tea Service
Arrange slices on a small white plate to contrast the caramel tones, and pair with freshly brewed dark-roast coffee or a fragrant Earl Grey. A single toasted almond or a light sprinkle of sea salt adds sophistication without fuss.
Dessert Platter for a Dinner Party
Create variety on a dessert board: include these slices alongside dark chocolate truffles, dried figs, and crisp pear slices. The pale white chocolate and marbled Biscoff make for a minimalist, refined visual that tastes indulgent without being heavy.
Gift Boxes and Portable Treats
Cut into smaller bite-sized squares, wrap individually in parchment or clear cellophane, and place in a small box tied with twine for an artisan homemade gift. Add a handwritten note about the recommended serving temperature to ensure the receiver enjoys them at their best.
Conclusion
I love that this No-Bake Biscoff Slice manages to be both effortlessly made and unmistakably elegant — it proves that you don’t need an oven or fussy technique to create something restaurant-worthy at home. The recipe welcomes personal touches: a pinch of sea salt, a scatter of chopped nuts, or a hint of vanilla can make it distinctly yours while preserving the recipe’s core charm. If you’re looking for inspiration or alternative takes on this concept, I also find it helpful to compare different home baker adaptations like this classic interpretation from Biscoff Slice (No Bake) · Chef Not Required and inventive riffs such as the version at No Bake Biscoff Bars- The Salt and Sweet Kitchen. Try it once and I’m confident you’ll return to it when you want a quick, impressive dessert — then begin to make it your own.
FAQs About No-Bake Biscoff Slice
I store these slices in an airtight container for up to 7 days. Keep them chilled — they hold their texture beautifully, and bring them out 10–15 minutes before serving to let the flavors bloom.
Yes — wrap individual squares tightly in parchment and place them in a freezer-safe container for up to 2 months. Thaw in the refrigerator overnight or at room temperature for 20–30 minutes before serving to avoid condensation on the white chocolate.
While traditional Lotus Biscoff biscuits contain wheat, you can recreate the texture and spice with gluten-free speculoos-style cookies or a blend of almond meal and a gluten-free cookie. The crucial element is the warm caramel-spiced flavor profile.
If white chocolate becomes grainy from overheating, stir in a teaspoon of neutral oil (or cocoa butter) while gently warming over a double boiler; this can often smooth it. If it’s beyond rescue, melt a fresh batch and pour over the chilled base — it’s quick, and you’ll keep that glossy finish.
Absolutely. The original recipe contains no nuts, and substituting toasted nuts is optional. For added crunch without nuts, try a scattering of toasted oat clusters or sesame brittle for contrast, keeping the final slice family-friendly and allergen-aware.
No-Bake Biscoff Slice
Ingredients
Base Ingredients
- 90 g Lotus Biscoff biscuits Choose fresh, crisp biscuits.
- 250 g icing sugar Sifted if possible for a silkier texture.
- 120 g butter (salted or unsalted) Use unsalted for control; melt gently.
- 249 g Biscoff spread The branded spread is ideal for consistency.
- 50 g Biscoff spread For topping, adds visual drama.
Topping Ingredients
- 200 g white chocolate Choose high-quality for best results.
Optional Add-ons
- Flaky sea salt Enhances sweetness and caramel notes.
- Toasted hazelnuts or almonds (finely chopped) For crunchy contrast.
- Vanilla bean paste For added flavor complexity.
- Dark chocolate drizzle Add bittersweet contrast.
Instructions
Prepare the Biscuit Base
- Crush the Lotus Biscoff biscuits into fine crumbs using a food processor or a zip-top bag and a rolling pin.
- Combine crushed biscuits, icing sugar, and melted butter in a large bowl, ensuring even moisture.
- Fold in the slightly warmed Biscoff spread until well mixed and glossy.
Assemble and Press
- Press the mixture into an 8×8 inch tin lined with baking paper, smoothing the top.
- Chill the base in the fridge for 10-15 minutes before topping.
Finish with White Chocolate and Biscoff Swirl
- Melt the white chocolate using a bain-marie or microwave, stirring until smooth.
- Pour and spread the melted white chocolate over the chilled base.
- Drizzle the remaining Biscoff spread over the top, creating a marbled pattern.
Chill, Slice, and Serve
- Refrigerate the tin for at least 2 hours until set.
- Lift the slab from the tin, slice with a warm knife, and enjoy.