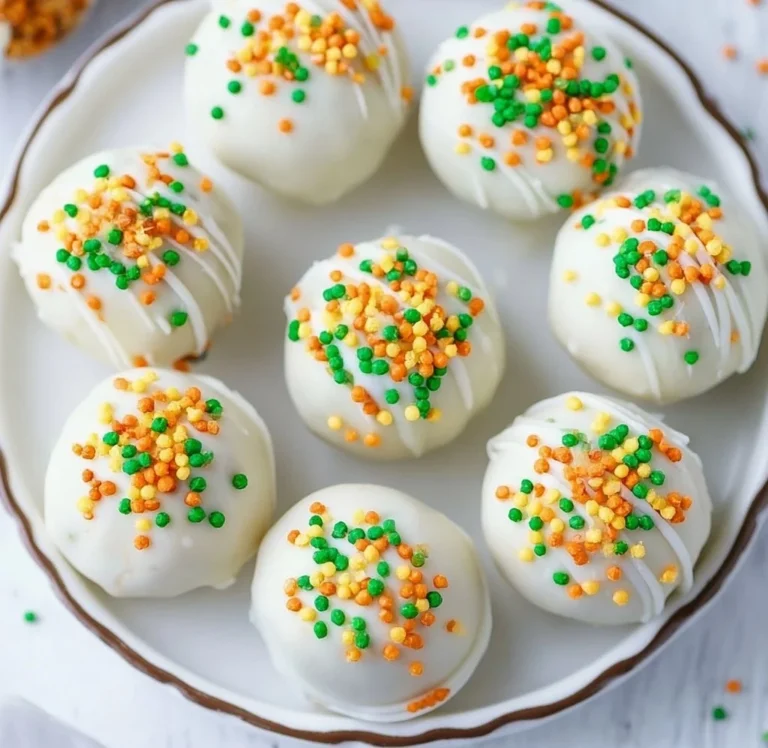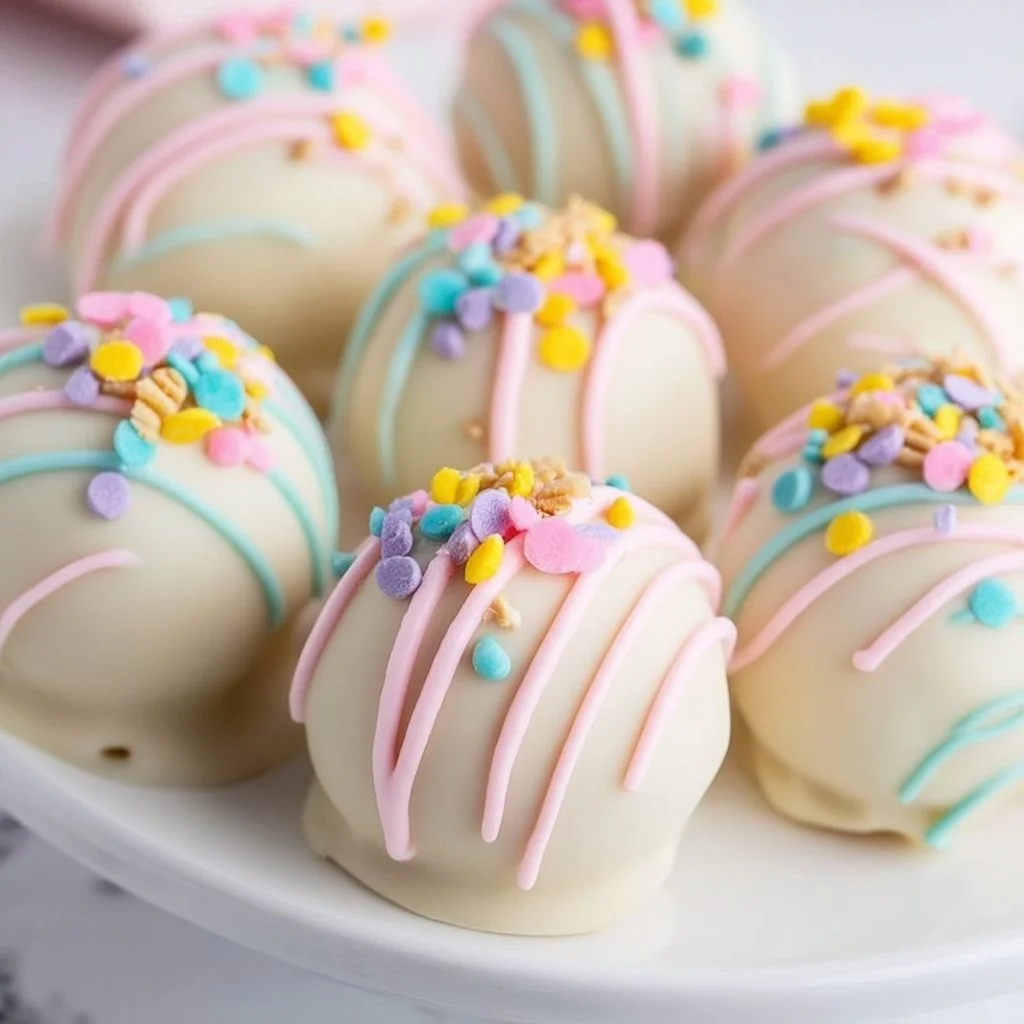
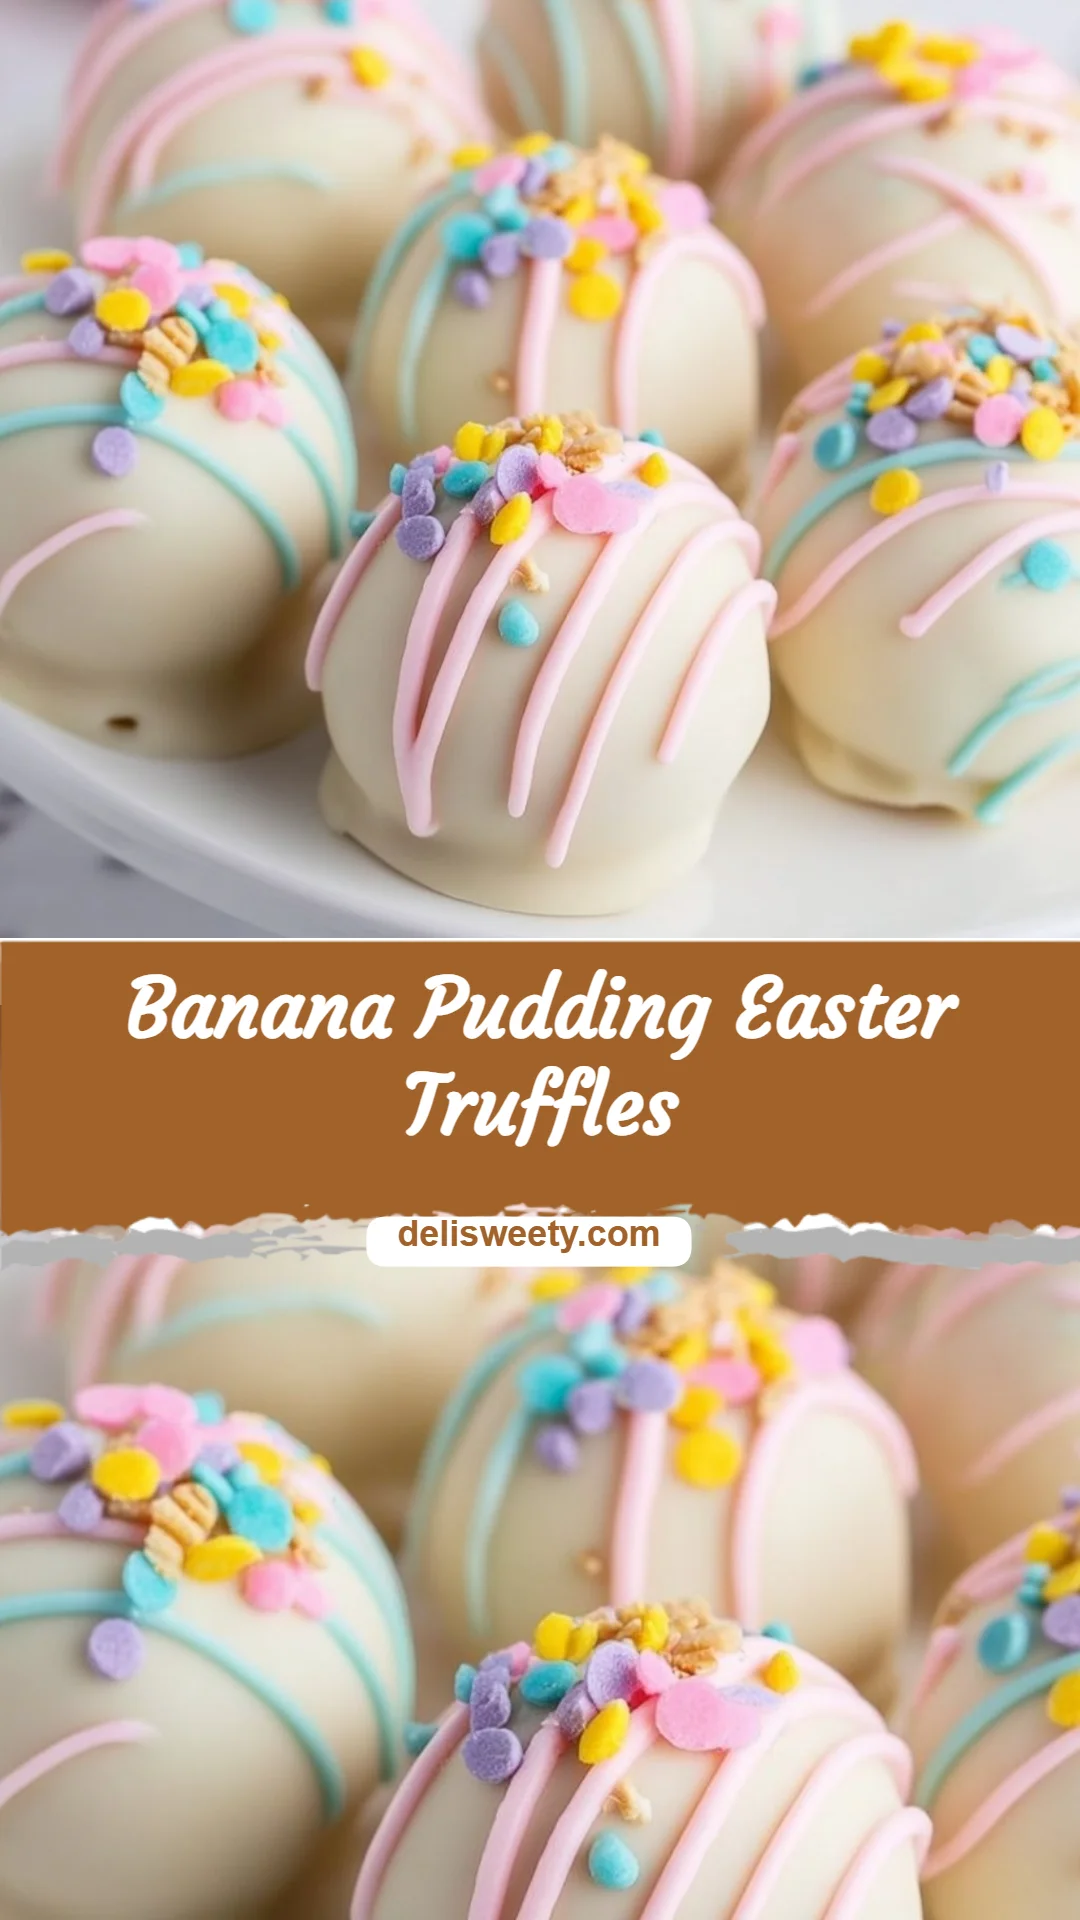
Banana Pudding Easter Truffles
After a long school pickup, homework scramble, or a late workday, I know the last thing anyone wants is a complicated dessert that adds stress. Banana Pudding Easter Truffles are my go-to: quick, forgiving, and something both kids and adults will happily eat. If you like simple banana desserts, you might also enjoy my easy chocolate chip banana bread for when you have a few extra bananas and five more minutes.
A Quick Look at This Banana Pudding Easter Truffles Recipe
This Banana Pudding Easter Truffles recipe pairs banana pudding mix and whipped heavy cream for a light, creamy filling that kids and adults both love. Crushed vanilla wafer cookies give it that classic banana pudding crunch, while mini chocolate chips add fun bites in every truffle. It’s fast — assembly and a short chill get you to rolling and dipping in under an hour — and it’s make-ahead friendly for busy evenings or holiday get-togethers. Minimal equipment, minimal dishes, and a crowd-pleasing result make these truffles perfect for weeknights, after-school treats, or last-minute dessert needs. Trust me — the process is surprisingly simple and reliably delicious.
Ingredients You’ll Need for Banana Pudding Easter Truffles
Essentials
- 1 cup banana pudding mix (instant) — the concentrated flavor base
- 2 cups heavy cream — whipped to give structure and creaminess
- 1 cup crushed vanilla wafer cookies — for texture and classic flavor
- 1/2 cup powdered sugar — adds sweetness and helps firm the mixture
- 1 teaspoon vanilla extract — to boost flavor and round out the banana
- 1/2 cup mini chocolate chips — tiny chocolate bites kids love
- Chocolate coating (for dipping) — melted chocolate or candy coating works
- Sprinkles (for decoration) — optional, but great for Easter or kid-friendly presentations
Optional Add-ons
- A pinch of cinnamon for a warm undertone
- Toasted pecans or chopped walnuts for adults who like a nutty crunch (offer on the side for allergy-safe homes)
- A few tablespoons of cream cheese (softened) to make the texture tangier and slightly firmer
- Shredded coconut for a tropical twist
- Yellow or pastel sprinkles to match Easter or party themes
Substitutions and Shortcuts
- Swap heavy cream with 1 1/2 cups whipping cream plus 1/2 cup Greek yogurt if you want a slightly tangier, lower-fat option — texture changes slightly but still family-friendly.
- If you don’t have vanilla wafers, use crushed graham crackers or an equal amount of shortbread cookies.
- Use store-bought chocolate melting wafers for a faster, smoother coating that sets quickly — less tempering, less mess.
- If you’re short on time, use pre-whipped whipped cream (in a can or tub) mixed carefully with the pudding mix — it reduces hands-on time, though texture is a touch lighter.
- For kids who prefer no visible chocolate, use white candy coating or colored melts for dipping.
- For flavor variety, try swapping the banana pudding mix for vanilla or butterscotch pudding powder — or check an alternative like sweet potato pudding ideas for different holiday dessert inspirations. (Note: that link is an idea resource, not required for this truffle recipe.)
How to Make Banana Pudding Easter Truffles Step-by-Step
I keep these steps short and to the point so you can move from pantry to plate fast. You don’t need fancy tools — a bowl, whisk or electric mixer, a spoon or small scoop, and a baking sheet lined with parchment will do the job.
- Whip the base: In a medium bowl, whisk the banana pudding mix into the heavy cream until smooth and thickened. If you have an electric mixer, use it on low for 1–2 minutes to reach soft peaks faster. Don’t worry about perfect peaks — thick, spreadable cream is fine.
- Add crunch and sweetener: Fold in the crushed vanilla wafers and powdered sugar. Fold gently with a spatula to keep the mixture light; you’re aiming for even distribution, not a uniform paste. This step adds texture and helps the truffles hold shape.
- Flavor and chips: Stir in the vanilla extract and mini chocolate chips. A quick stir or two is all you need — the chips add fun bites that kids love.
- Chill to firm: Cover the bowl and chill in the refrigerator for about 30 minutes. This firms the mixture so it’s easy to scoop and roll; if you’re in a hurry, pop it in the freezer for 15 minutes but check it every 5 minutes so it doesn’t freeze solid.
- Scoop and roll: Use a small cookie scoop or spoon to portion the chilled mixture, then roll into small balls with lightly oiled or chilled hands. Lightly wet hands with cold water to stop sticking — less cleanup than flouring hands.
- Dip in chocolate: Melt your chocolate coating according to package directions and dip each ball using a fork or dipping tool. Let excess drip off, then set the truffle on a parchment-lined sheet.
- Decorate quickly: Add sprinkles or other decorations while the chocolate is still wet so they adhere easily. This is a fun step to include kids in — they can sprinkle while you dip.
- Chill again: Refrigerate the dipped truffles until the chocolate sets and everything is firm, about 15–30 minutes. Store in an airtight container in the fridge until serving.
Tips that save time:
- Use one bowl for most steps to cut down on washing dishes. If you’re careful folding, you won’t need extra bowls.
- Pre-measure dry ingredients while the cream chills for faster assembly.
- If kids want to help, give them a station for decoration — I let my kids sprinkle while I handle the dipping.
Common Mistakes to Avoid
I want you to feel confident and calm while making these truffles. A few small missteps can slow you down or create extra cleanup, but they’re easy to avoid.
Mistake 1: Over-whipping the cream
If you whip the heavy cream too long you’ll end up with butter-like lumps and grainy texture. Stop when you have soft to medium peaks — it should hold together but still be spreadable.
Mistake 2: Skipping the chill
Trying to scoop and roll warm or soft mixture leads to sticky hands and misshapen truffles. A 30-minute chill makes rolling fast and neat. If you’re impatient, a quick 10–15 minute freeze works but check often.
Mistake 3: Rushing the dip
Dipping truffles in chocolate that’s too hot or too cool causes uneven coatings and cracks. Use melted chocolate at a spreadable, glossy consistency (not piping-hot) and work in batches so the chocolate stays at the right temperature.
Serving Suggestions for Banana Pudding Easter Truffles
These truffles are an easy winner on the table. I keep serving simple so cleanup is minimal and the family can enjoy dessert without fuss.
Kid-Friendly Sides
Serve with graham cracker crumbs, extra mini chocolate chips, or a small cup of sliced fruit like strawberries or banana coins. Kids enjoy dipping the truffles or stacking them with fruit on little skewers.
Easy Add-Ons
Set out a small “decorating station” with leftover sprinkles, finely chopped nuts (if safe), and coconut flakes. This takes almost no prep and keeps kids engaged while adults finish dinner or cleanup.
Minimal Prep Presentation
Arrange truffles on a simple platter lined with parchment or Easter-themed cupcake liners for no-fuss presentation. They look festive without needing extra effort, and you can store leftovers in the same tray covered with plastic wrap.
Conclusion
I know busy families need desserts that are fast, flexible, and kid-approved — these Banana Pudding Easter Truffles deliver on all three. They save time, tolerate substitutions, and are easy to make ahead so you’re not stuck in the kitchen during family time. If you want another version or inspiration for a similar no-bake treat, check out this take on the idea from a trusted source: Banana Pudding Truffles – Take Two Tapas. I hope you give these a try and that they become one of your go-to simple desserts — feel free to make them your own and share what your family loved most.
FAQs About Banana Pudding Easter Truffles
Banana Pudding Easter Truffles will stay fresh in an airtight container in the refrigerator for 3–4 days. I keep them on a single layer or separate layers with parchment to prevent sticking.
Yes — you can freeze the truffles after dipping. Place them on a parchment-lined tray until firm, then transfer to a freezer-safe container with layers separated by parchment. They’ll keep for up to 1 month. Thaw in the refrigerator for a few hours before serving.
Absolutely. The flavor is familiar (banana and vanilla wafer) and mini chocolate chips add fun texture. To win over picky eaters, make some truffles without sprinkles or use white chocolate coating — small tweaks make them more approachable.
Yes — they’re great to prepare a day or two ahead. Make and dip them the day before, store in an airtight container, and take them out shortly before serving. This makes party day easier and keeps your evening stress-free.
For speed, use pre-whipped topping mixed gently with the pudding mix, choose melting wafers for faster dipping, and prep the crushed wafer cookies in advance. I also recommend chilling the mixture while you finish other parts of dinner to streamline the process.

Banana Pudding Easter Truffles
Ingredients
Essentials
- 1 cup banana pudding mix (instant) the concentrated flavor base
- 2 cups heavy cream whipped to give structure and creaminess
- 1 cup crushed vanilla wafer cookies for texture and classic flavor
- 1/2 cup powdered sugar adds sweetness and helps firm the mixture
- 1 teaspoon vanilla extract to boost flavor and round out the banana
- 1/2 cup mini chocolate chips tiny chocolate bites kids love
- chocolate coating (for dipping) melted chocolate or candy coating works
- sprinkles (for decoration) optional, but great for Easter or kid-friendly presentations
Optional Add-ons
- a pinch cinnamon for a warm undertone
- 1/2 cup toasted pecans or chopped walnuts for a nutty crunch (offer on the side for allergy-safe homes)
- 2 tablespoons cream cheese softened to make the texture tangier and slightly firmer
- shredded coconut for a tropical twist
- yellow or pastel sprinkles to match Easter or party themes
Instructions
Preparation
- In a medium bowl, whisk the banana pudding mix into the heavy cream until smooth and thickened. If you have an electric mixer, use it on low for 1–2 minutes to reach soft peaks faster.
- Fold in the crushed vanilla wafers and powdered sugar gently with a spatula to keep the mixture light.
- Stir in the vanilla extract and mini chocolate chips.
- Cover the bowl and chill in the refrigerator for about 30 minutes.
- Use a small cookie scoop or spoon to portion the chilled mixture, then roll into small balls.
- Melt your chocolate coating according to package directions and dip each ball using a fork or dipping tool.
- Add sprinkles or decorations while the chocolate is still wet.
- Refrigerate the dipped truffles until the chocolate sets and everything is firm, about 15–30 minutes.