5-Ingredient No-Bake Crunchie Slice
There’s a particular kind of comfort in biting into something that snaps and melts at the same time — the airy crunch of honeycomb against a glossy chocolate top, the sweetened creaminess that follows. I know many home cooks hesitate at recipes that sound “too fancy”: worry about tempering chocolate, odd tools, or long bakes. This 5-Ingredient No-Bake Crunchie Slice delivers restaurant-worthy texture and flavor without the fuss, and if you enjoy quick, impressive sweets, you might also appreciate this collection of no-bake ideas I often turn to for inspiration.
A Quick Look at This 5-Ingredient No-Bake Crunchie Slice Recipe
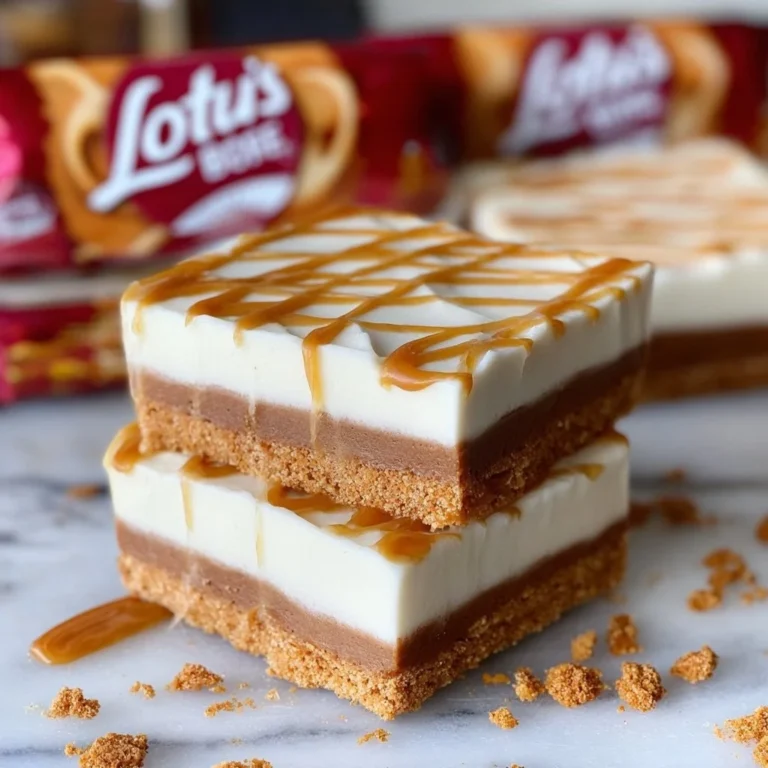
This slice celebrates two stars: the caramelized, honeycomb shards of Crunchie bars and the lush, sweet density of condensed milk. The base — buttery digestive crumbs — gives a delicate biscuit backbone while a milk chocolate topping adds warmth and sheen. It’s a showstopper for presentation and texture: crunchy, chewy, and glossy in every bite, yet forgiving to make. Special enough for guests, simple enough for a weekday treat — and there’s a small twist in the crumb that keeps you coming back.
Ingredients You’ll Need for 5-Ingredient No-Bake Crunchie Slice
Essentials
- 350 g Digestive biscuits — choose a fresh, quality brand for a clean, biscuity flavor; finely crushed for the best mouthfeel.
- 300 g sweetened condensed milk — the anchor of the slice: sweet, sticky and beautifully binding.
- 100 g salted butter, melted — adds richness and a whisper of savory balance; salted butter lends a lovely nuance, which is why the recipe also includes an extra 10 g for finishing.
- 8 Crunchie bars, chopped — the signature honeycomb pieces; chop to varied sizes so some melt into caramel pockets and other shards stay crunchy.
- 200 g milk chocolate, melted — a good-quality milk chocolate gives the top its creamy snap and glossy finish.
Optional Add-ons
- Flaky sea salt — a light sprinkle lifts sweetness and creates a sophisticated contrast.
- Toasted nuts (hazelnuts or pecans), roughly chopped — add depth and an earthy counterpoint to the honeycomb.
- Orange zest — a few strips add fragrant citrus brightness that complements milk chocolate.
- Espresso powder (a pinch) — deepens chocolate flavor without turning it coffee-forward.
- Cocoa nibs — for additional crunch and bittersweet complexity.
Substitutions and Shortcuts
- No Digestives? Use graham crackers or tea biscuits for a similar texture — aim for the same total weight (350 g).
- Dairy-free condensed milk and vegan butter work if you need a vegan-friendly slice; the texture will be slightly different but still delicious.
- Unsalted butter + a pinch of sea salt can replace salted butter if you don’t have it on hand.
- If you don’t want to chop Crunchie bars by hand, pulse them gently in a food processor — stop before they pulverize so you retain shards.
- For the quickest crumb method, place biscuits in a sealed bag and bash with a rolling pin; a food processor is faster but clean crushing yields the best, consistent texture.
- If you’re collecting no-bake inspiration or want different bases and toppings, I often consult a trusted no-bake collection for ideas and technique crossovers.
How to Make 5-Ingredient No-Bake Crunchie Slice Step-by-Step
I’ll walk you through the method as I make it — calm and purposeful. The goal is to preserve the Crunchie shards and build layers of texture so each slice feels thoughtful rather than hurried.
Prep your pan and biscuits. Line an 8 x 8 inch tin with parchment, allowing a little overhang for easy removal. Crush the 350 g digestive biscuits to fine, even crumbs — either a food processor or a sealed bag and rolling pin will do. The finer the crumb, the more cohesive the base will be; a few slightly coarser bits give the slice pleasant interest.
Warm the condensed milk and butter. In a small saucepan over very low heat, combine the 300 g condensed milk with 100 g melted salted butter just until they’re fully combined and glossy. I prefer gentle heat to avoid scorching; you only want enough warmth for the ingredients to marry, not to simmer.
Build the biscuit mixture. Transfer the biscuit crumbs to a mixing bowl and pour the warmed condensed milk–butter mixture over them. Stir gently to incorporate, making sure all crumbs are moistened — this ensures the base comes together firmly when chilled.
Fold in your Crunchie shards. Add the chopped Crunchie bars and fold them through the biscuit mix. Aim for even distribution: some pieces will soften and meld into caramel pockets, while others will remain crunchy. That contrast is part of the slice’s charm, so don’t over-mash.
Press into the tin. Pour the combined mixture into the prepared tin and press it down evenly and firmly. Use the base of a measuring cup or a piece of parchment to press without sticking; a compact base prevents crumbling when you slice later.
Melt and add the chocolate layer. Gently melt 200 g milk chocolate — either in a bain-marie or short bursts in the microwave, stirring frequently for a smooth finish. Pour the melted chocolate over the chilled (or room-temperature) biscuit base and spread it into an even layer. A thin top layer keeps the bite balanced — too thick and it overpowers the textural play.
Finish with a buttery drizzle. Melt an additional 10 g of butter and drizzle it lightly over the chocolate. This small step gives the top a glossier sheen and a hint of buttery roundness that ties the base and chocolate together. If you like, sprinkle a few extra chopped Crunchie pieces or flaky salt at this stage.
Chill until set, then slice. Refrigerate the tin for at least 2 hours, or until the chocolate is fully set and the base feels firm to the touch. Use the parchment overhang to lift the slab from the tin, transfer to a cutting board, and cut into slices with a sharp knife — warming the knife under hot water and wiping between cuts helps achieve clean edges.
Why these steps? Each decision preserves texture and flavor: gentle heat keeps condensed milk silky, pressing ensures clean slices, and the final butter drizzle elevates the finish. Take your time at the pressing and spreading stages — the results are worth it.
Common Mistakes to Avoid
Mistakes are simply lessons in disguise. I’ve seen the same small missteps happen often, and each is easily prevented with a little attention. Here are three common pitfalls and how to dodge them so your slice comes out as glossy and texturally perfect as you imagine.
Mistake 1: Overheating the condensed milk
Cooking condensed milk too hot can alter its texture and flavor. Keep heat low and stir gently only until combined with the butter to maintain a silky binder for your crumbs.
Mistake 2: Crushing the Crunchie into dust
If you pulverize the Crunchie bars, you lose that heavenly, honeycomb crunch. Aim for a mix of sizes — some shards for crunch, a few smaller bits that soften — to capture contrast in every mouthful.
Mistake 3: Slicing before the chocolate is set
Cutting too soon yields smeared chocolate edges and a soft base. Chill for at least the recommended time, and if you’re in a warm kitchen, give it a little extra time to firm up so slices hold their shape.
Serving Suggestions for 5-Ingredient No-Bake Crunchie Slice
This slice rewards thoughtful plating but doesn’t demand fuss. Present it with a sense of occasion: clean lines, a little garnish, and complementary flavors that let the honeycomb and chocolate sing.
Elegant dessert plate
Serve two generous slices with a quenelle of lightly whipped cream and a few candied orange segments. A dusting of cocoa or a tiny scatter of crushed toasted hazelnuts completes the plate with texture and color.
Casual afternoon tea
Cut into smaller bars and arrange on a rustic board with plain cookies and fresh fruit. The Crunchie slice’s bold sweetness pairs beautifully with strong tea or milky coffee.
Gift or picnic
Wrap individual squares in parchment and tie with twine for a polished homemade gift. The slice travels well and remains crisp when chilled until departure; pack it alongside sliced apples for a picnic contrast.

Conclusion
I believe desserts should feel generous and achievable — this 5-Ingredient No-Bake Crunchie Slice is a perfect example: bold in texture, refined in presentation, and forgiving in execution. If you’d like another take on a similar honeycomb-topped treat, I recommend exploring Crunchie Slice – What Jessica Baked Next for a different interpretation. And for a practical, compact version to compare notes with your own slice, see 5-Ingredient No-Bake Crunchie Slice – Fitwaffle Kitchen. Try a batch this weekend — invite someone to share it, and let me know how you presented it; I love hearing how readers make recipes their own.
FAQs About 5-Ingredient No-Bake Crunchie Slice
Yes — I often make this slice a day or two in advance. Store it covered in the refrigerator; remove it about 10–15 minutes before serving so the chocolate softens slightly and the flavors open up.
Absolutely. Wrap individual pieces tightly in plastic and foil and freeze for up to one month. Thaw in the refrigerator overnight, then bring to cool room temperature before serving for best texture.
You can substitute with other honeycomb or toffee candies, but the distinctive airy crunch of Crunchie bars is integral to the recipe’s character. If you use a denser candy, expect different textural results.
Use a sharp knife warmed under hot water and wiped dry between cuts. Chilling the slice thoroughly before cutting is crucial for clean edges and minimal chocolate smearing.
Try sprinkling flaky sea salt on top or serving slices with a lightly bitter coffee or unsweetened yogurt. A thin layer of darker chocolate (semi-sweet) on top also cushions sweetness while preserving texture.

5-Ingredient No-Bake Crunchie Slice
Ingredients
Base Ingredients
- 350 g Digestive biscuits, finely crushed Choose a fresh, quality brand for the best flavor.
- 300 g sweetened condensed milk The anchor of the slice; sweet and sticky.
- 100 g salted butter, melted Adds richness; includes an extra 10 g for glazing.
- 8 pieces Crunchie bars, chopped Chop into varied sizes for texture.
- 200 g milk chocolate, melted Good-quality for a creamy snap.
Optional Add-ons
- Flaky sea salt Enhances sweetness with a sophisticated contrast.
- Toasted nuts (hazelnuts or pecans), roughly chopped Adds depth and earthiness.
- Orange zest Adds fragrant citrus brightness.
- Espresso powder, a pinch Deepens chocolate flavor.
- Cocoa nibs For additional crunch.
Instructions
Preparation
- Line an 8 x 8 inch tin with parchment, allowing for overhang.
- Crush the digestive biscuits to fine, even crumbs using a food processor or sealed bag with a rolling pin.
Mixing Base
- In a saucepan over low heat, combine sweetened condensed milk and melted salted butter until fully combined and glossy.
- Transfer biscuit crumbs to a bowl, pour the milk-butter mixture over, and stir gently until all crumbs are moistened.
Incorporating Crunchies
- Fold in the chopped Crunchie bars carefully to ensure an even distribution.
- Press the mixture firmly into the tin using a measuring cup or parchment.
Chocolate Layer
- Melt the milk chocolate gently and pour over the chilled biscuit base, spreading evenly.
- Drizzle melted butter over the chocolate and optionally sprinkle with Crunchie pieces or flaky salt.
Setting and Serving
- Chill in the refrigerator for at least 2 hours until set.
- Use parchment overhang to lift the slice out and cut into slices with a sharp knife.